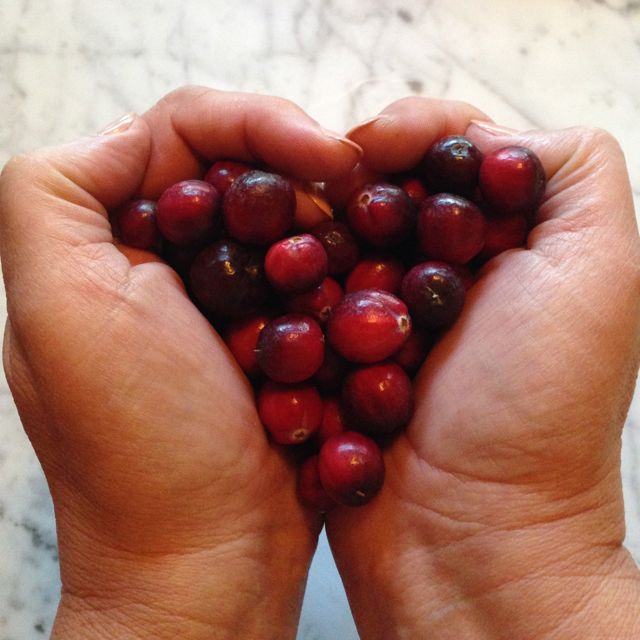
And there’s nothing easier than making your own cranberry sauce. It only takes three ingredients and the taste is a hundred times better than what comes out of a can.
All you do is boil cranberries, sugar and water.
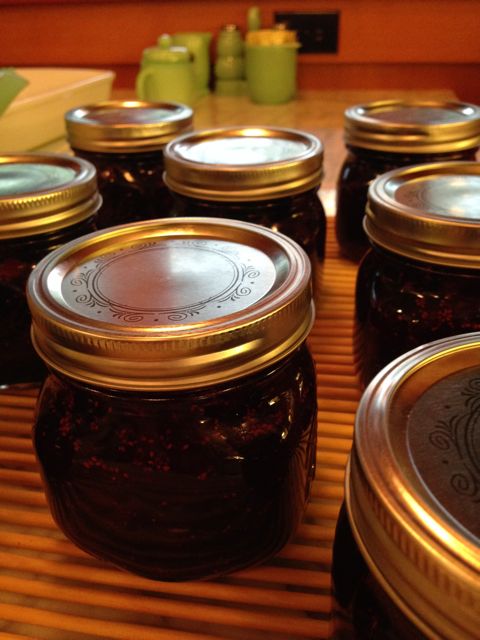
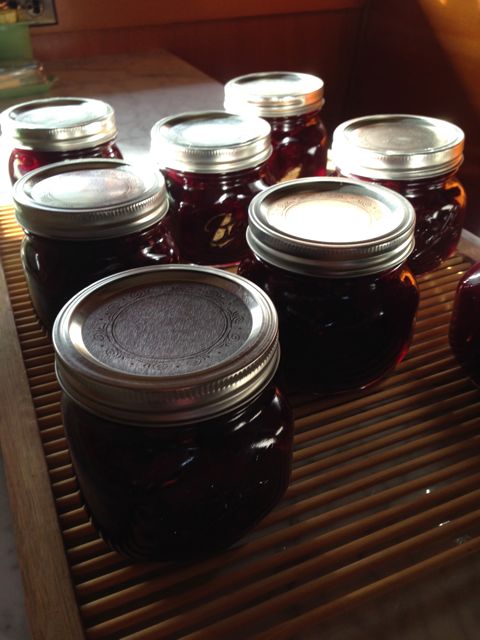
I told you it was easy! Once it’s done, you can put it in a covered container and put it in your fridge for up to two weeks, or you can can it to keep it longer or give as gifts.
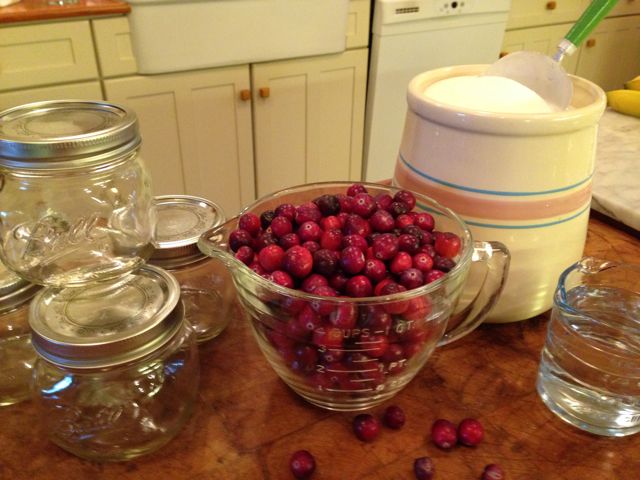
Cranberry Sauce
1 cup water
1 cup sugar
3-4 cups cranberries
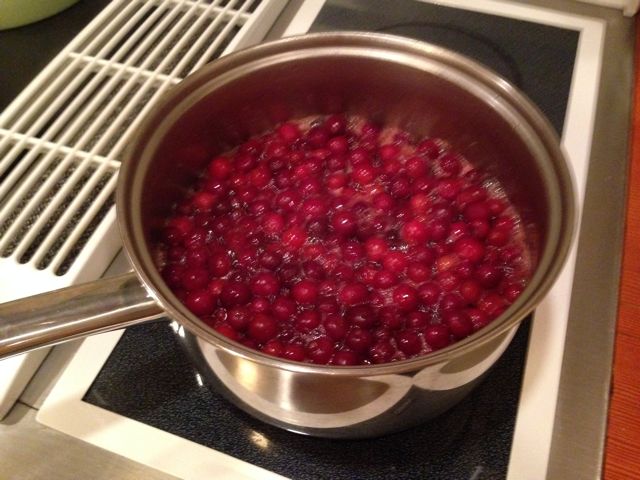
In a large saucepan, bring sugar and water to a boil
Add rinsed cranberries and boil 10 – 15 minutes—until the “popping” stops
Pour into a dish, cover and chill—or pour into sterilized jars and seal.
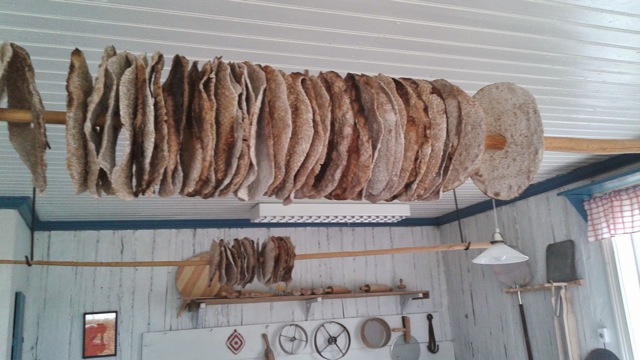
Sweden has a long history of baking hard bread from rye flour. The hard, crisp bread was often hung from a pole suspended from the ceiling, where it would keep all winter.
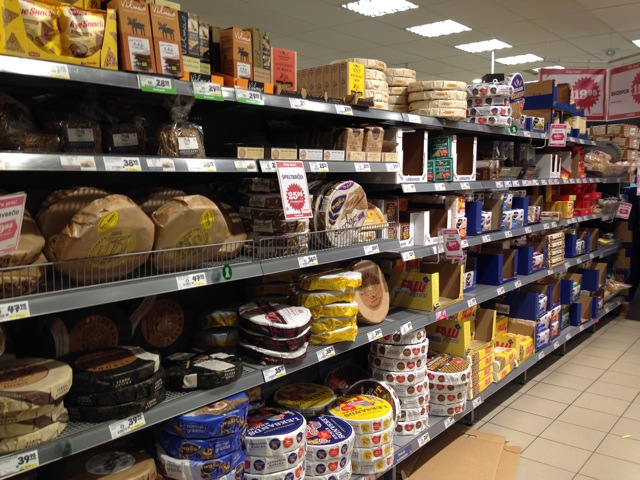
It’s still hugely popular. In many households it’s served with every meal. Every grocery store has an aisle filled with lots and lots choices.
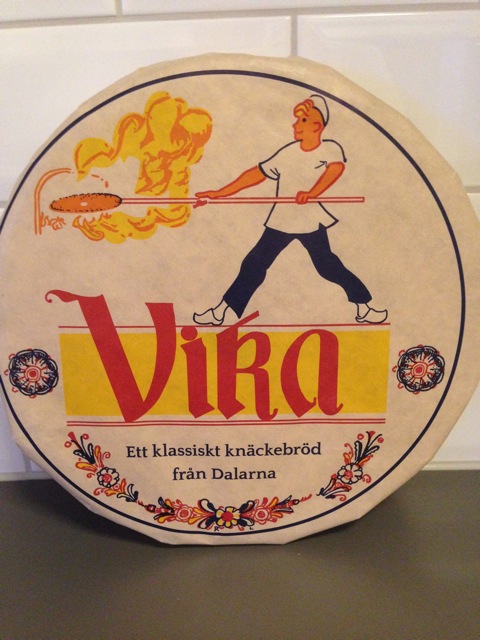
For years there was small bakery that still baked their bread in wood fired ovens. It was called Vika Bread. They had eight wood fired ovens and a great package!
About a year ago, Vika bread was bought out by one of the big hard bread producers. Sadly, they moved the operation from the small town where it was produced and—sadder still—they destroyed the wood fired ovens.
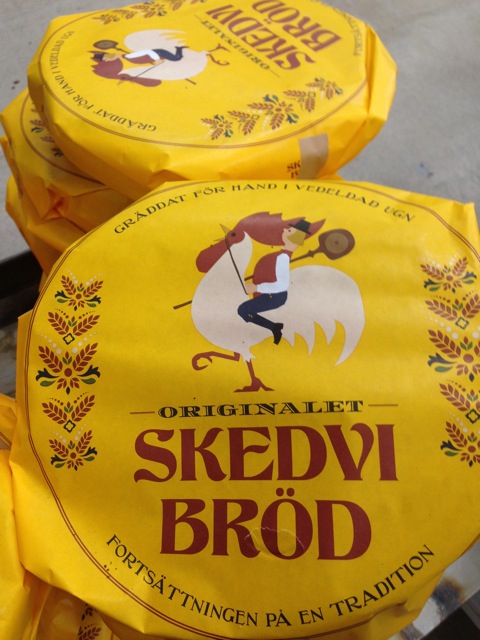
But….a couple of young entrepreneurs have started a new wood fired bakery! It’s in the little town of Stora Skevdi, and is called Skevdi Bread!
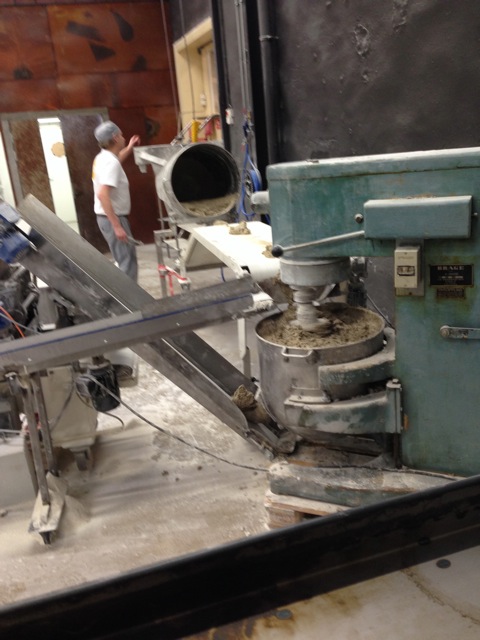
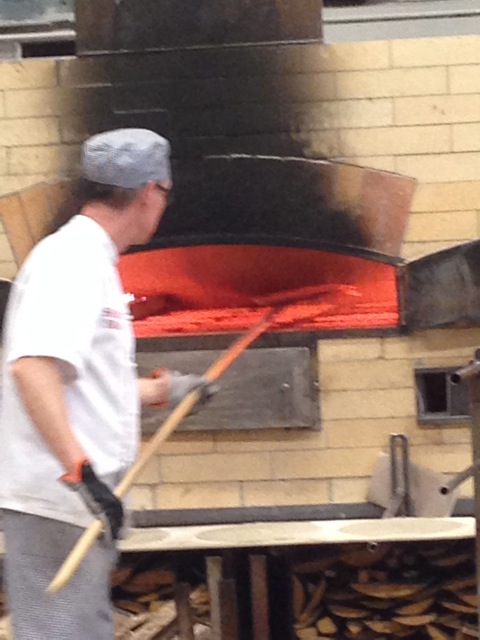
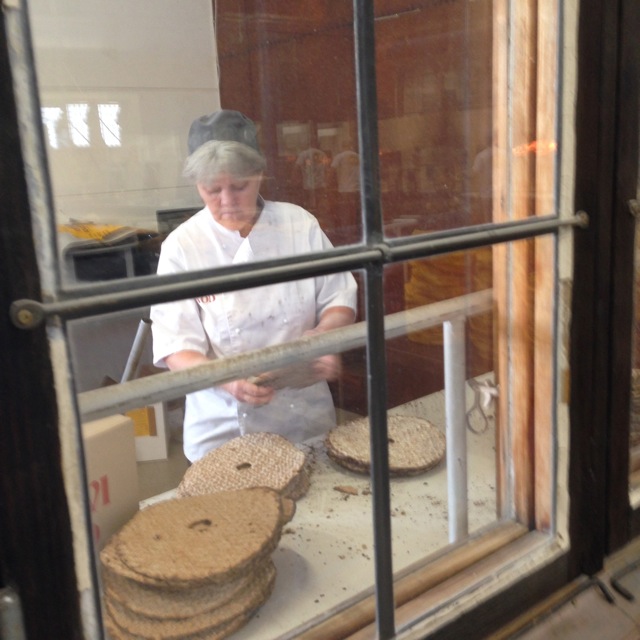
They have four ovens—and the public is welcome to come observe the operation! The dough is mixed in giant mixers, rolled by a machine and the big rounds are cut out—with a little hole in the middle, just like in the old days. They spend a short time in a proofer, then it’s off to the ovens.
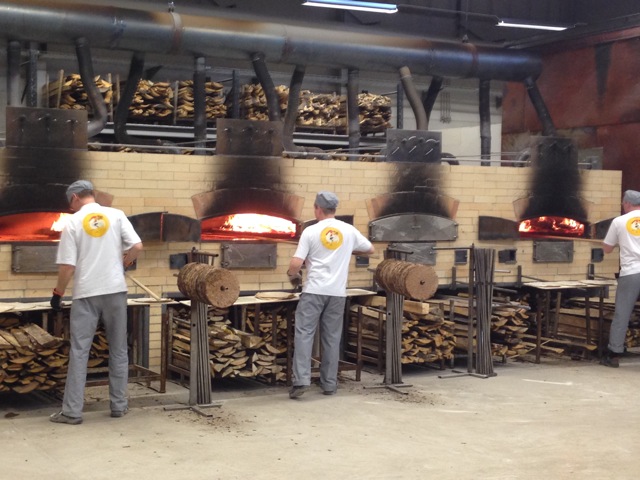
There are slabs of wood burning on each side of the domed oven—each one tended by a single baker.
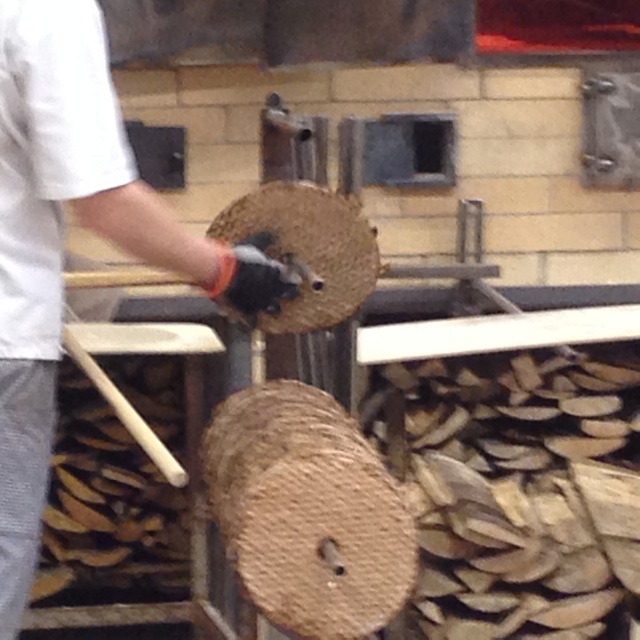
They use large paddles to slide the rounds into the oven. Each oven holds fifteen rounds. After they’re in the oven a few minutes, they move the ones in the middle to the edges.
They don’t bake very long. When they’re finished, the baker slides them over a metal pole to cool. That’s the purpose of the small hole in the middle.
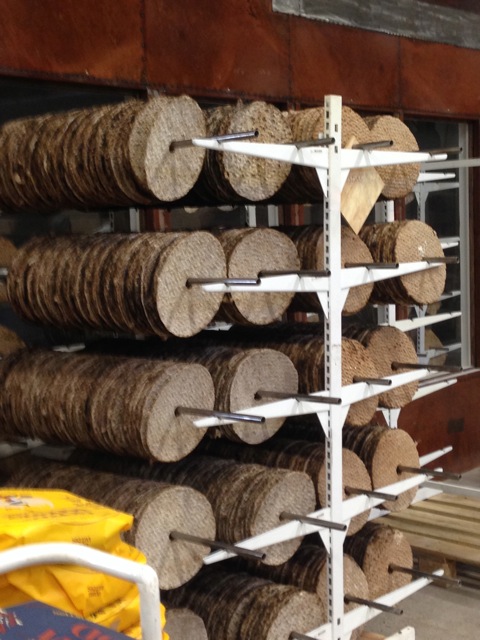
When the rods are filled, they’re moved to a specially made rack.
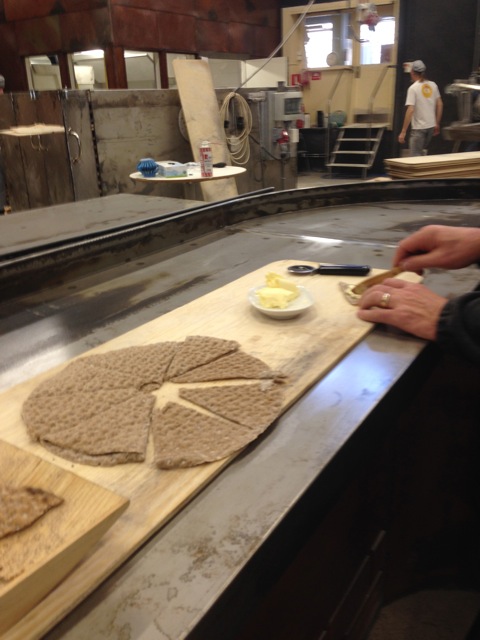
While we were watching, one of the bakers came over and asked if we’d like to try a warm sample. you bet!
It was really tasty. I’d never had warm hard bread before. It was delicious!
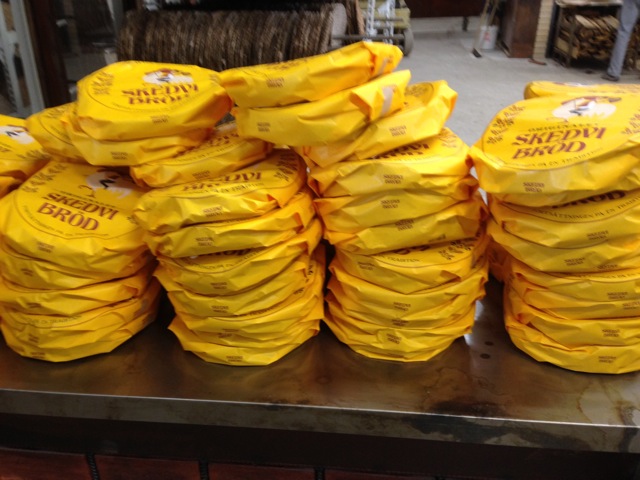
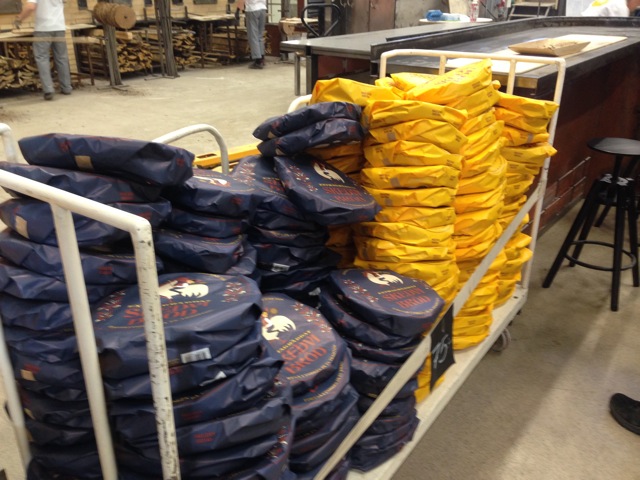
The cooled rounds are inspected…
…and hand wrapped.
The yellow wrapped are “regular” and the blue ones are “dark” baked.
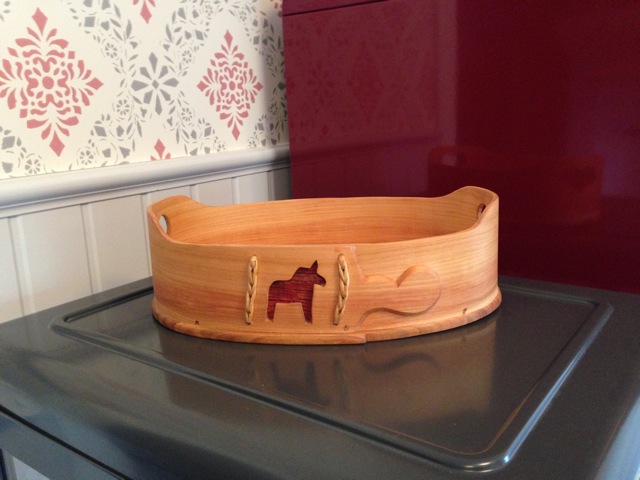
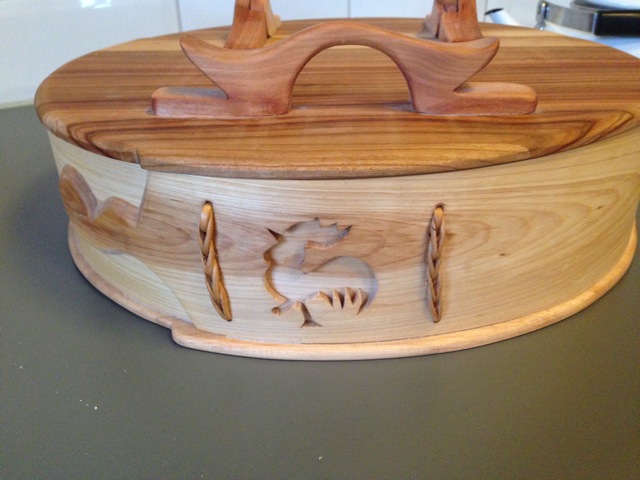
Last summer at “Cow Midsummer, ” a festival in Dala-Floda, I’d purchased a hand crafted wooden basket to serve hard bread in.
At Skevdi Bread, they had a great storage box with their logo cut into it. It reminded me of the one I already had—and I decided to buy it. When I got home and compared the signatures on the bottom, sure enough—made by the same craftsman!
Now you’ll find Skevdi Bread on our table for most meals!
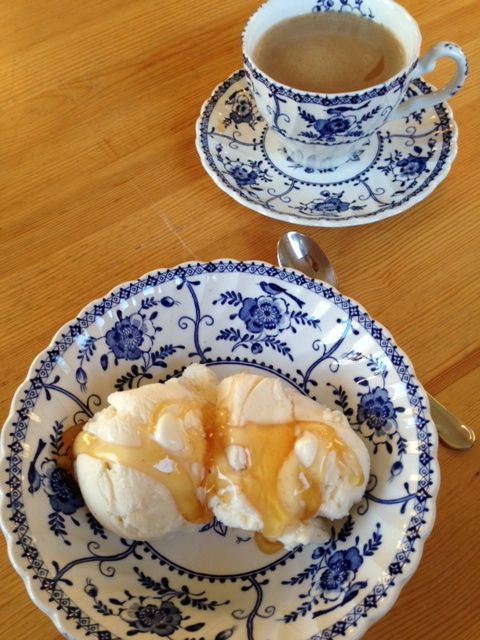
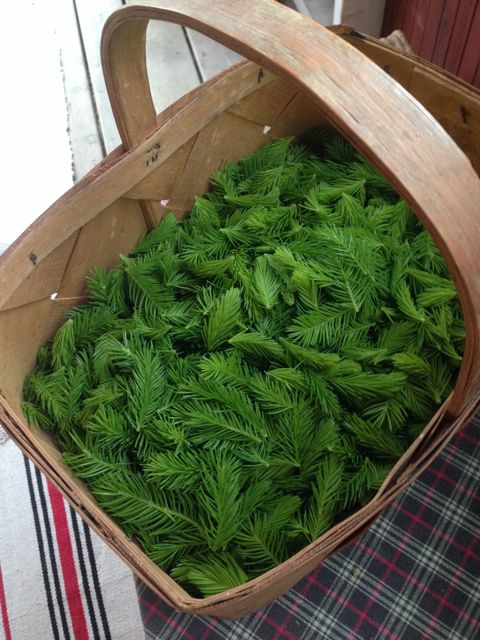
Last year a Swedish friend posted on Facebook that she was making syrup from the new growth on spruce trees. I was intrigued, and asked for more details. I got better than that. Bob and I got an invitation for a visit and a taste! Iris served it over ice cream and sent us home with a little in a jar. It’s hard to describe the taste except to say it tastes like spruce!
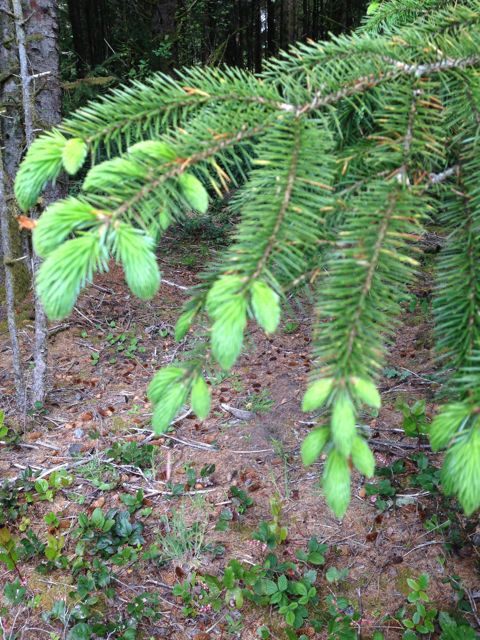
I could hardly wait to try it this year. And I was double blessed because I was home in in Washington in May when the spruce shoots were ready there, and in Sweden in June, when they were ready here!
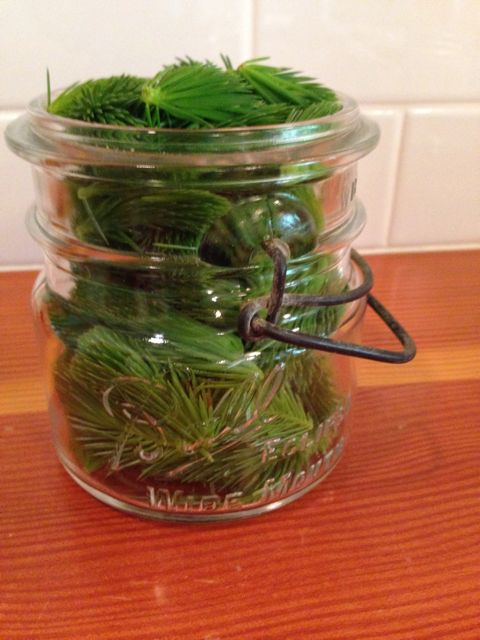
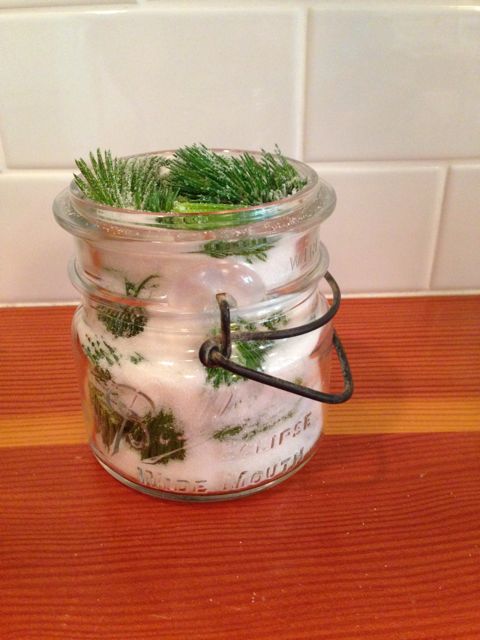
Iris’ method was a no cook method. You pack a jar with spruce tips…
…and add an equal amount of sugar.
This you put in a sunny windowsill and shake it everyday. Leave it for a few weeks. The result will be a beautiful, very light colored syrup.
BUT, I’m not always so patient! I did some research online and found you can cook your ingredients and have results much faster.
It was fun but time consuming to gather the spruce tips. The variety of spruce seems to be a little different in Long Beach than it is in Sweden. In Sweden, a gently pull was all that was needed to remove the tips. In Long Beach, I found it was easier to use a pair of kitchen shears, as they didn’t pull right off.
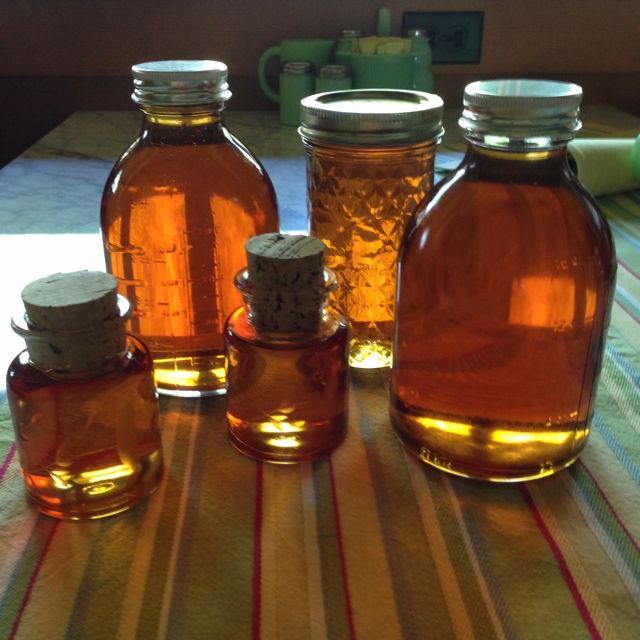
Following the recipe I found online, the Long Beach batch used equal parts tips, sugar and water, and it took nearly five hours to cook it all down enough to make a syrup. Below is the Long Beach batch.
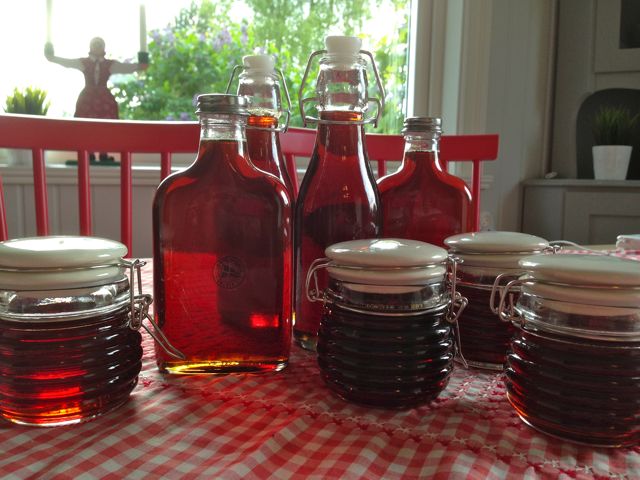
In Sweden, I reduced the amount of water and the syrup cooked down much faster. The result was a syrup that is a bit thicker and also darker, but I don’t know if that was the cooking method or the difference in the spruce.
Here’s my recipe.
SPRUCE TIP SYRUP
4 cups water
8 cups spruce tips
8 cups sugar
Note: It’s easy to adjust the amounts, depending on how much you pick. Just figure one part water, two parts spruce tips, two parts sugar.
Rinse spruce tips in a colander to remove any dust or dirt.
Put tips and water in a large pan and bring to a boil. Remove from heat and let set 24 hours.
Strain liquid. Discard spruce tips.
Return liquid to the pan and bring to a boil. Add sugar.
Return to a boil, being careful not to let it boil over. Reduce heat and simmer 1 – 3 hours.
Enjoy!
Besides eating the syrup on ice cream, we’ve eaten it on toast–like honey. If you try it, let me know how you use it, too!
Categories: brilliant ideasComments Off on Three Bathrooms Become Two
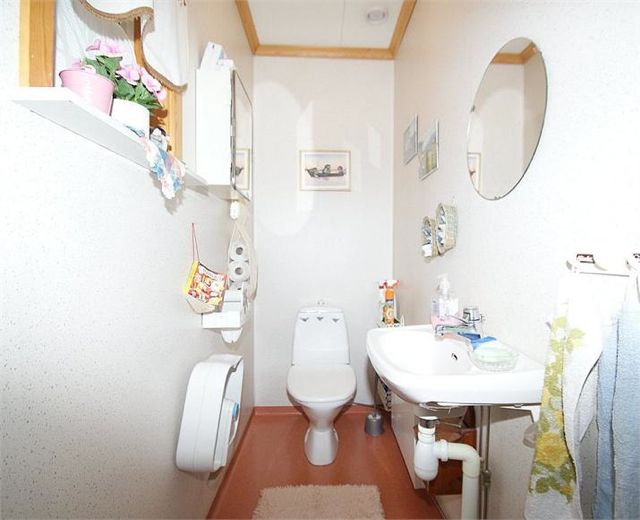
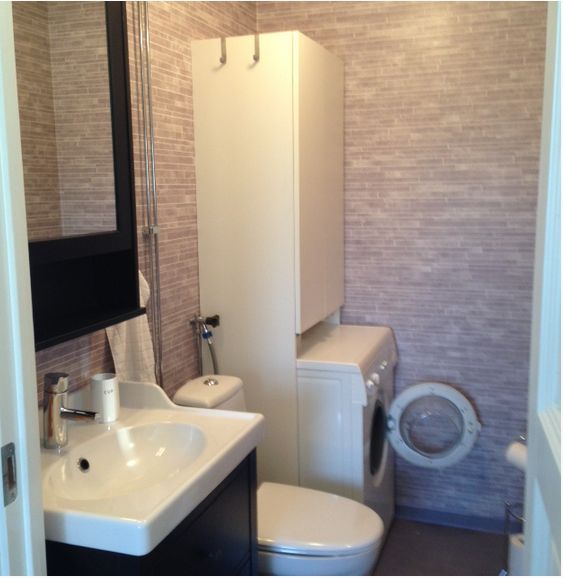
Our small Swedish House had three bathrooms! That’s quite unusual for a house here. They were all quite small and I think they were probably added to the house in the 1989 remodel.
Just off the entry hall was a long, skinny half bath.
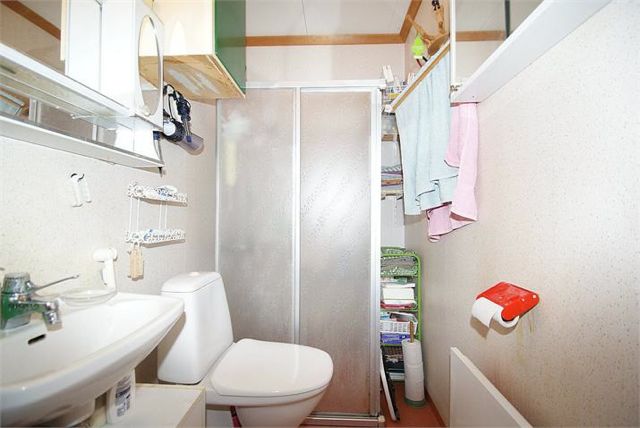
Next to it, but accessed from the bedroom was the long, skinny master bath. It had a sink, toilet and shower stall squeezed into the small space.
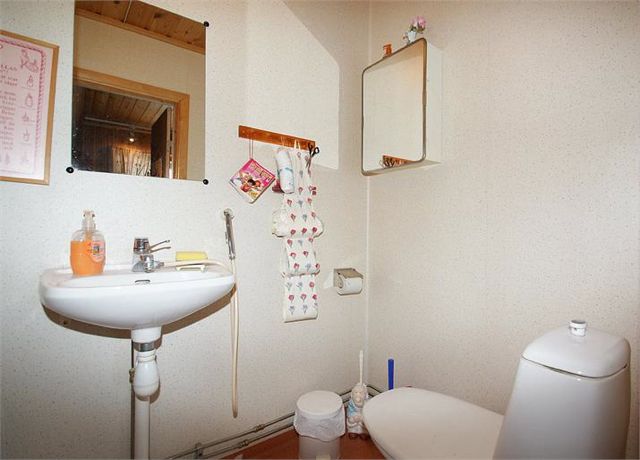
And upstairs, under the eaves, was another small bath.
Bob and I thought bathroom remodels were above our pay grade (read skill level) so we hired a local firm to do it. We decided that we could eliminate the half bath off the entry hall. We took the front half and turned it into a coat closet. The back half we opened up to the master bath and used the space for a shower.
The work happened while we were gone, but our neighbor Anna was good enough to send us update photos.
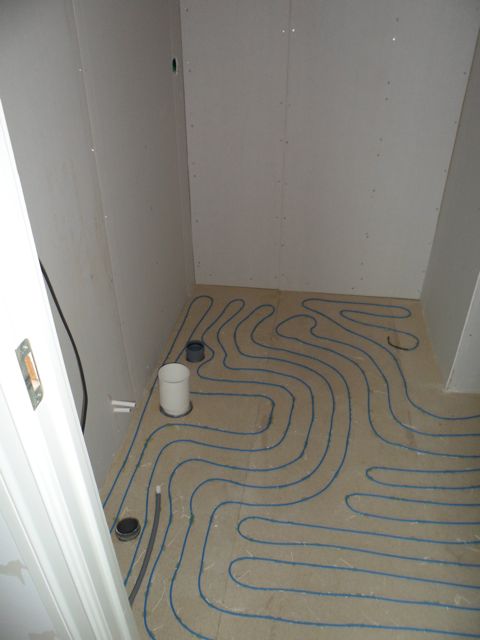
We opted for floor heat.
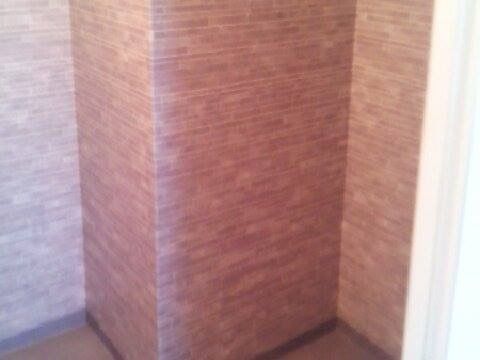
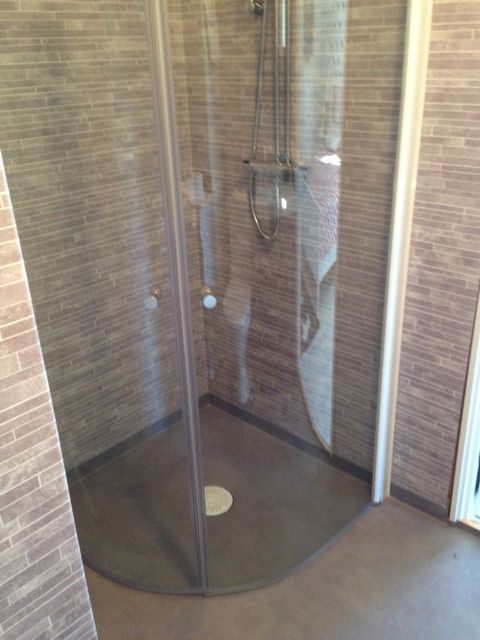
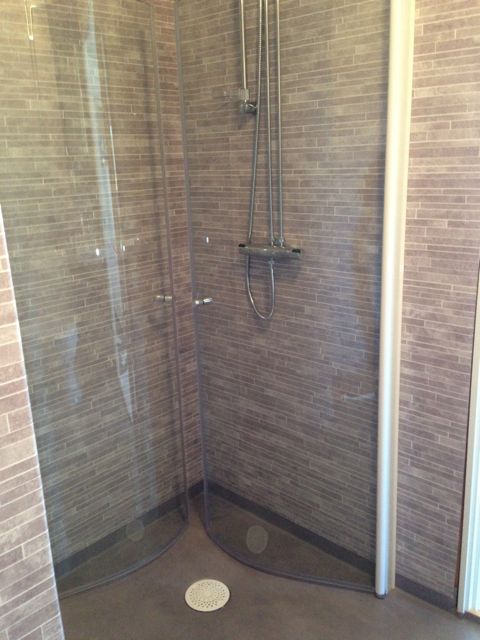
Bathrooms in Sweden are ‘wet rooms,” so the walls have a special vinyl covering. We chose this design for the master bath.
They have the coolest shower doors here. They’re curved! It makes the corner shower feel quite spacious.
But even better, when you aren’t showering, they can be swung against the wall, making the room feel much bigger!
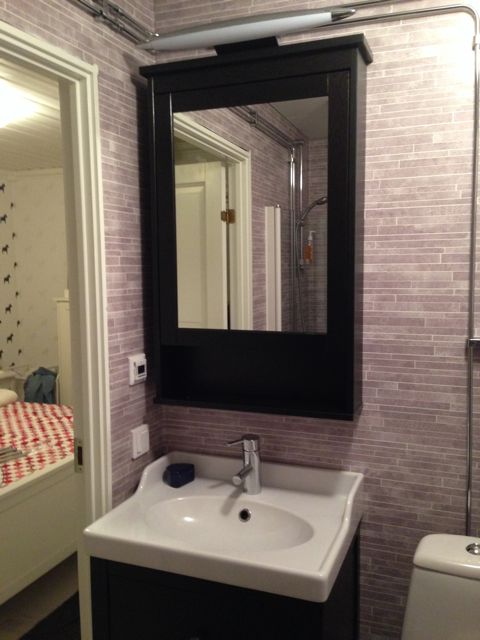
We got a new sink and toilet, but they are in the same space as before.
By taking space from the hall bathroom for the shower, we were able to bring the washing machine up from the cellar and put it in the bathroom where the old shower was.
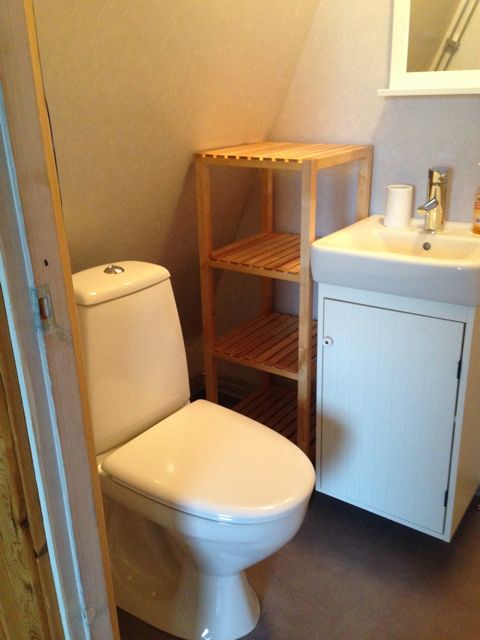
We tucked the toilet in the upstairs bath under the eaves and we have the same shower arrangement up there as in the master bath.
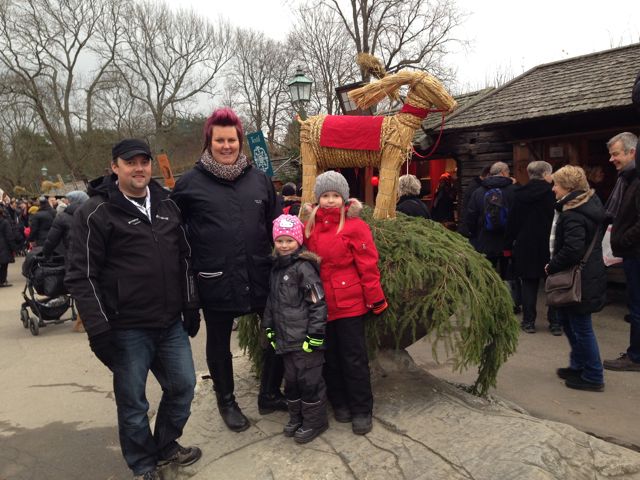
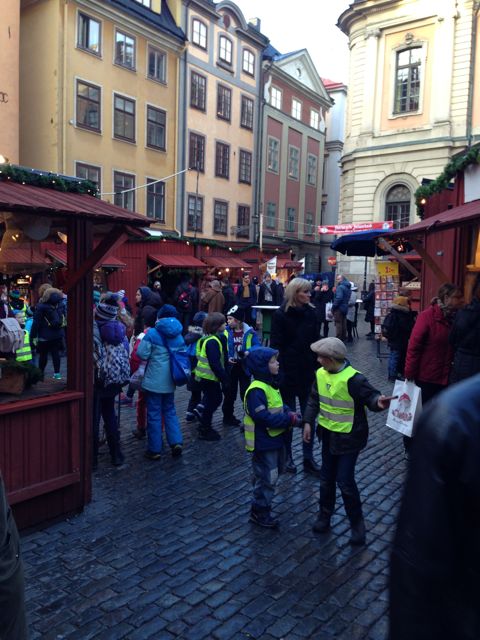
I sneaked off to Sweden for two weeks in early December to get a little taste of Sweden at Christmas and do a little shopping. My neighbors, Ronny, Anna, Maya and Elwira picked me up at the airport and we spent two days in Stockholm!
It was late in the afternoon by the time we got there, but we went to Gamla Stan – the old city – and enjoyed the Christmas Market!
It was crowded but a great way to get some Christmas spirit.
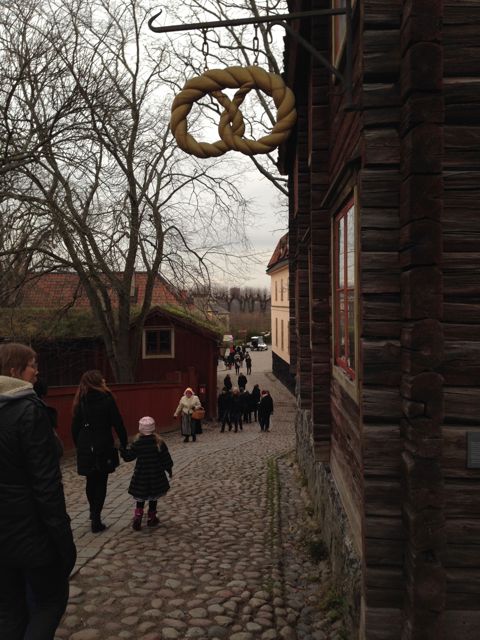
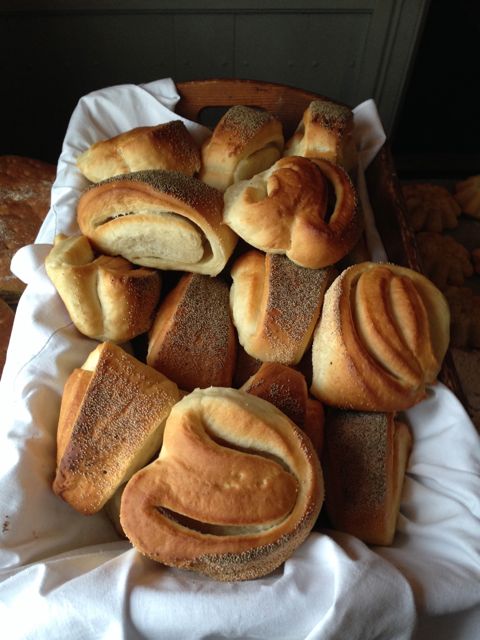
The next day we went to Skansen, the outdoor museum. Our first stop was the old bakery.
It smelled wonderful in there!
The breads were beautiful.
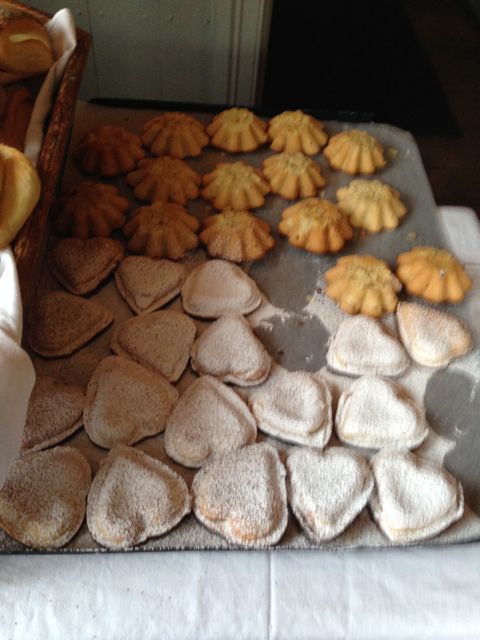
And the cookies delicious!
Instead of gingerbread men, there were goats, pigs and hearts!
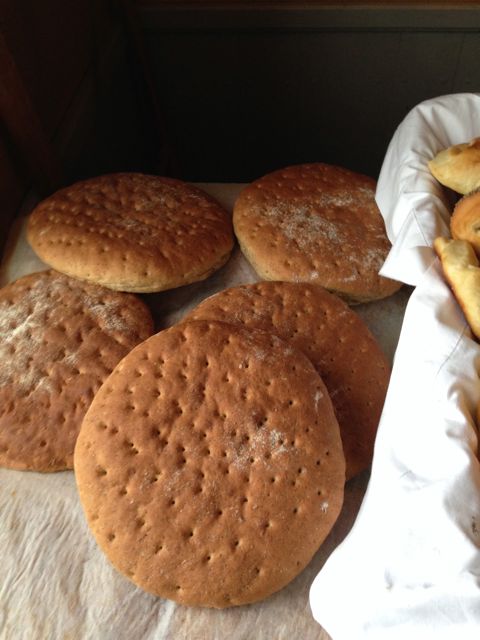
There were dozens of booths selling items, including this one selling a thin, hard bread. I brought some home with me!
It was so fun checking out all of the wonderful offerings.
I would have liked to have it all!
When I got to our house in Nås, I discovered Anna had a surprise for me.
She had decorated my front porch!
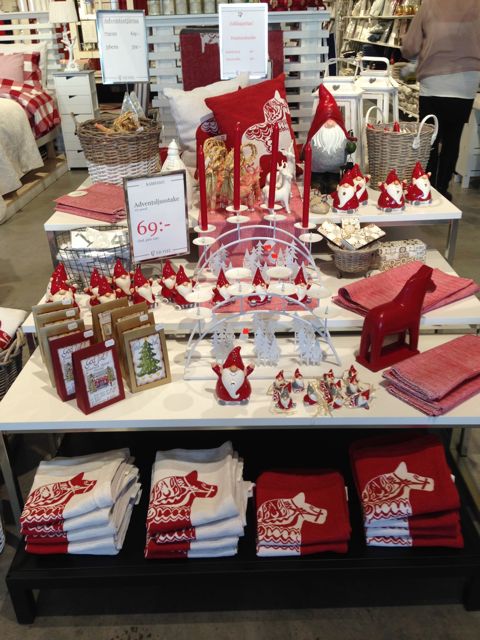
After a few days in Nås, Anna and I went to Borlänge to do a little more retail therapy.
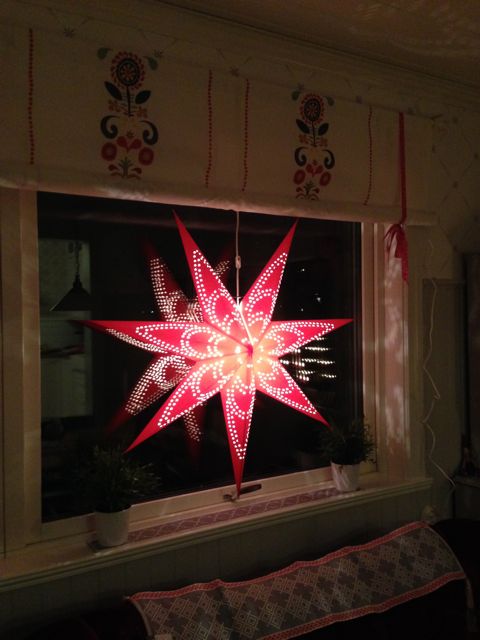
I fell in love with the Christmas stars…
…and bought one for our dining room window.
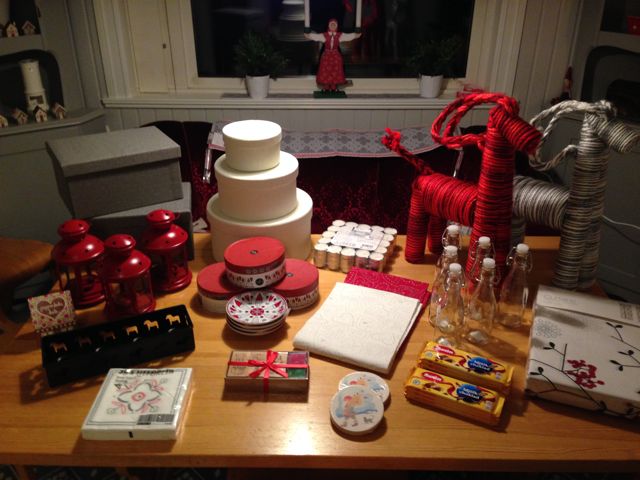
Here’s some of the other loot that I bought that day!
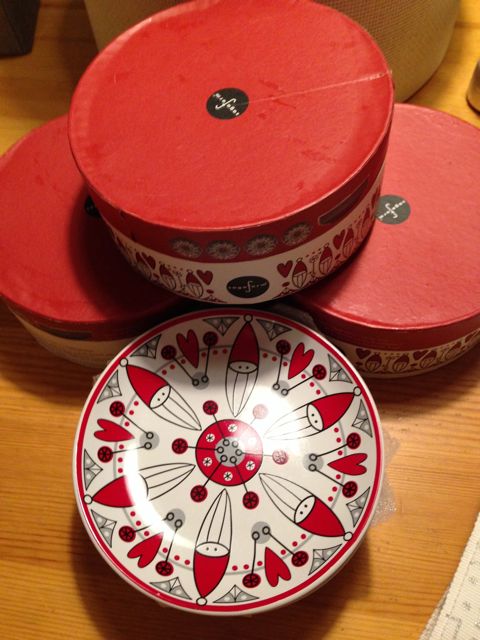
These tomte tidbit plates were just too cute to pass up.
Before coming home, I got to go back to Stockholm with Sven-Eric.
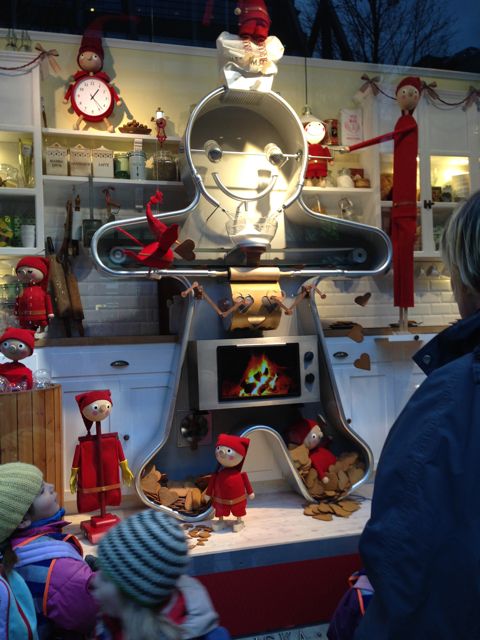
The windows of the NK Department Store were absolutely charming.
They were animated and drew quite a crowd.
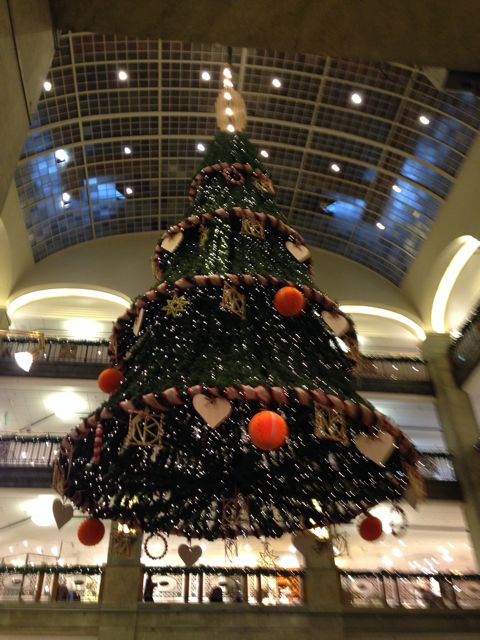
Inside this giant tree hung from the ceiling.
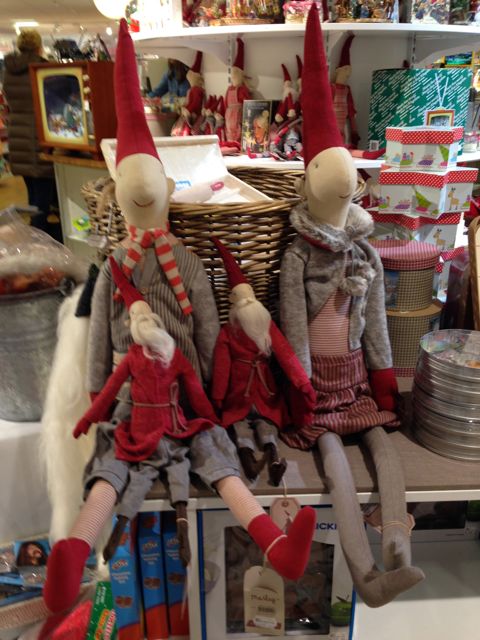
There were rows of tomtar.
They were pretty hard to resist.
Some of these little guys found their way to our grandchildren this Christmas!
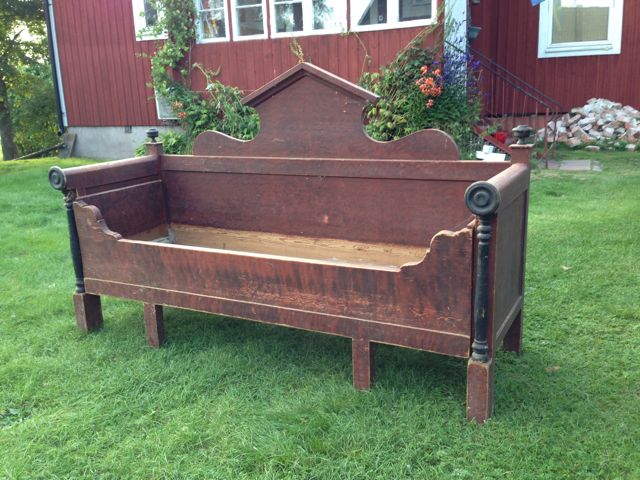
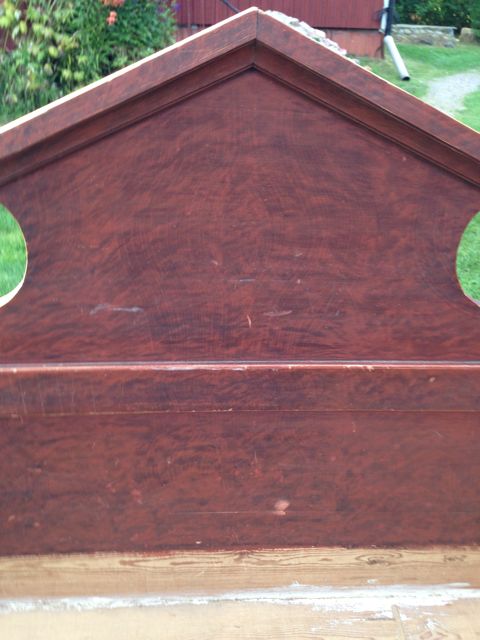
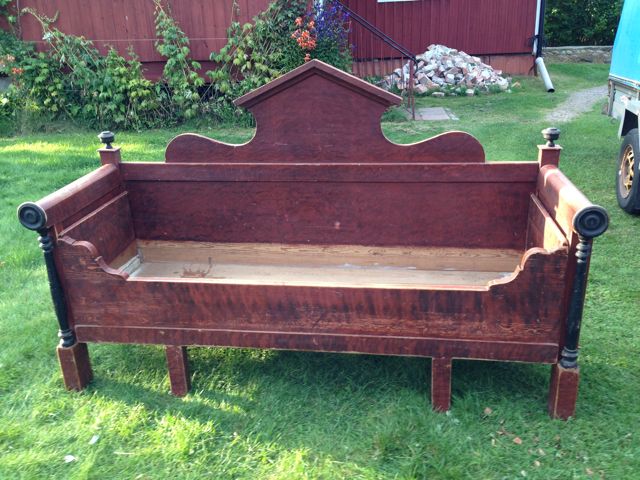
I’ve known for a long time that I wanted a “kitchen sofa” for the Swedish house, and I’ve been looking for one every time I’m in Sweden. I’ve seen a lot of these wooden sofas, but I had a very specific style in mind. Shortly before we left last summer, Torsten called one afternoon to say he was on a service call and the customer had a sofa for sale–a sofa he was sure I would like. And he was right!
It was in an out building at an old farmstead, and Bob and I took the trailer over and picked it up. I love the shape of the back, the rolled arms and, best of all, the faux finish. A lot of antique Swedish furniture is painted with a style meant to imitate a more expensive wood.
Oh, and the front pulls out so it can be used as a bed! This sofa is missing it’s seat, but that will be an easy fix. A wooden seat and a nice cushion and it will be good to go!
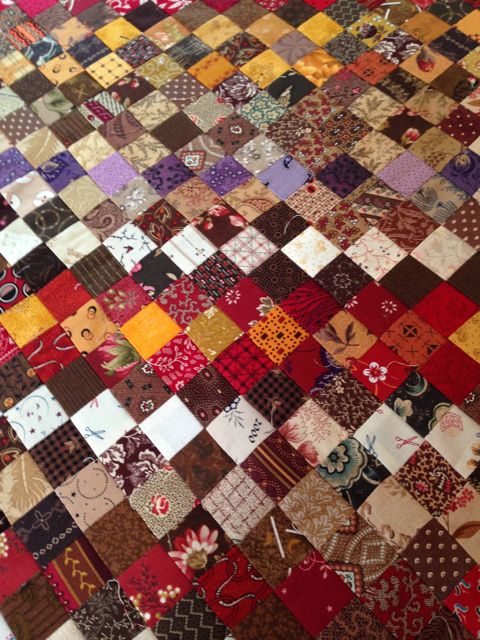
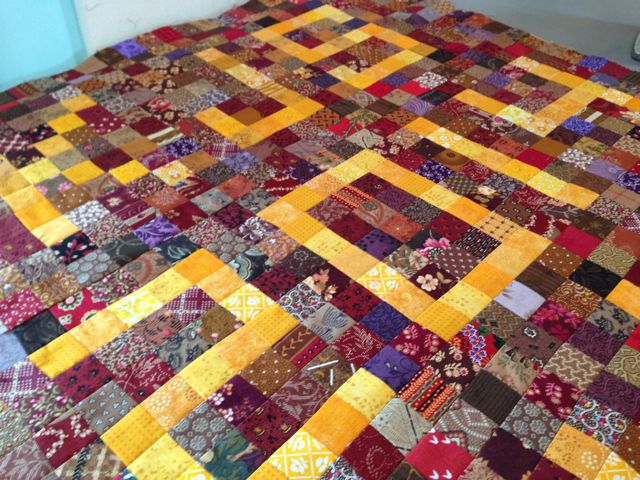
I had the bright idea that I might make a quilt that could be used to cover the cushion. I don’t do a lot of quilting with turn-of-the-century fabrics, but their earth colors seemed perfect for this sofa. Then I decided a postage stamp quilt would be “fun.” So, I set about cutting a lot of little squares and sewing them together.
I wanted the design to be on-point…
…so I had to construct the quilt diagonally.
That requires a lot of thinking! Finally, I had the top pieced. 4224 pieces, but who’s counting!
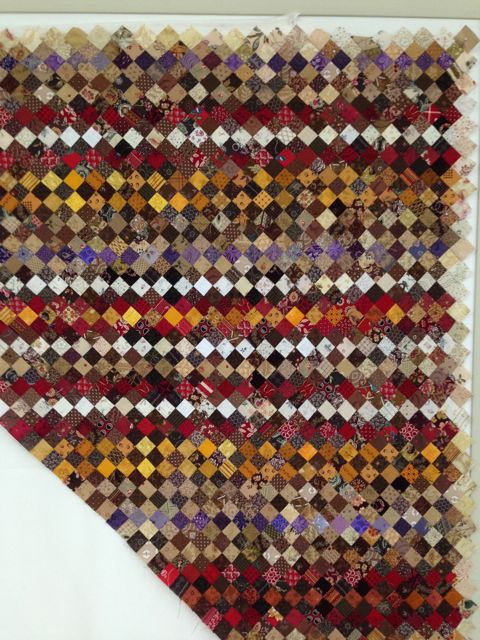
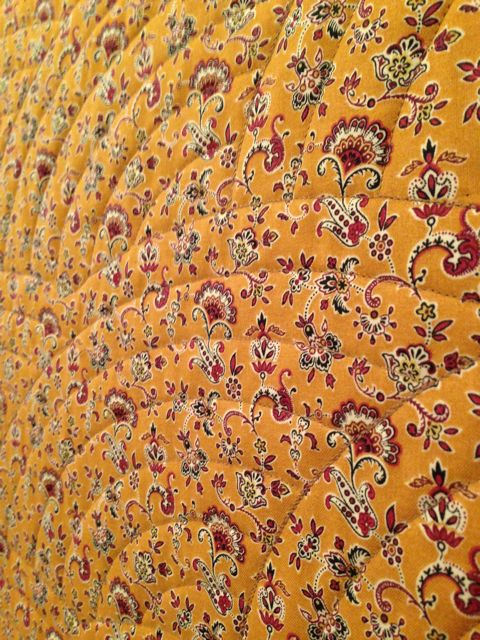
But I had a lot of squares left, so I decided I could use some of them for the “label.”
So, just five hundred and some more squares and I had a label.
I sewed it into the back of the quilt.
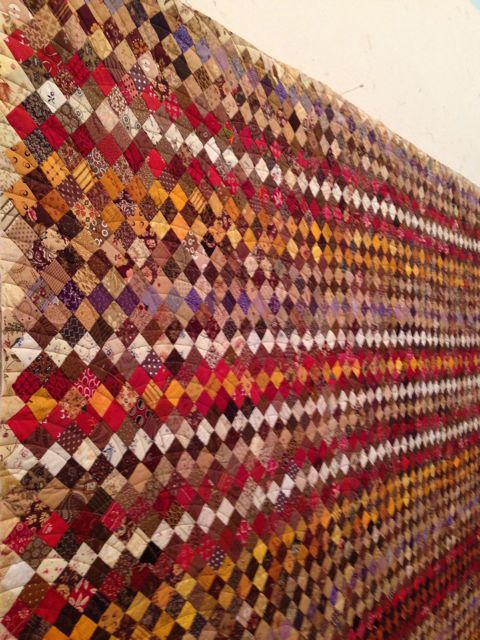
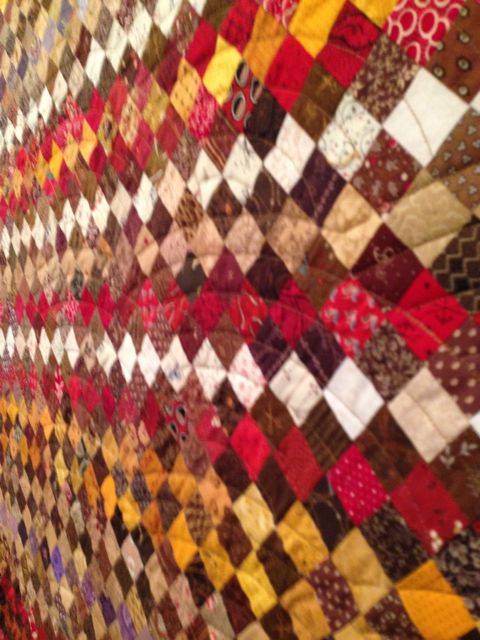
I wasn’t sure how to quilt it. In the end, I chose a Baptist fan design.
You can see it a little better from the back.
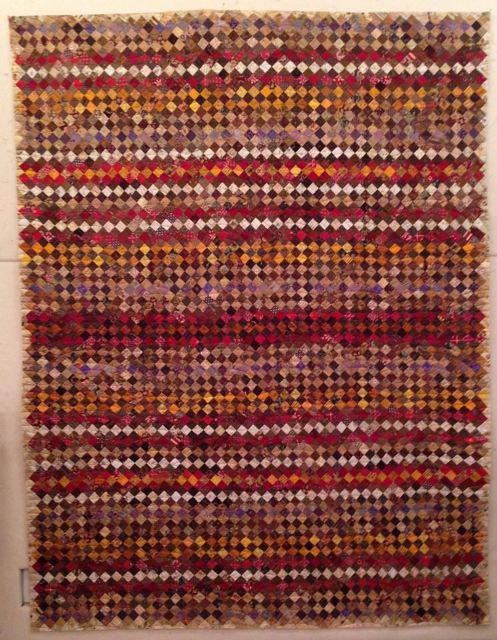
I’ve decided it will just be a sofa quilt, not a cushion over. I have something else in mind for that!
A little footnote. Last week, the farmhouse and the outbuilding where we got the kitchen sofa burned to the ground in a horrible fire. I’m so glad the sofa is with us.
“Sju sorter kakor” – that’s Swedish for “seven kinds of cookies.” Seven kinds of cookies is a centuries old tradition in Sweden. Any hostess worth her salt always offers her guests seven kinds of cookies.
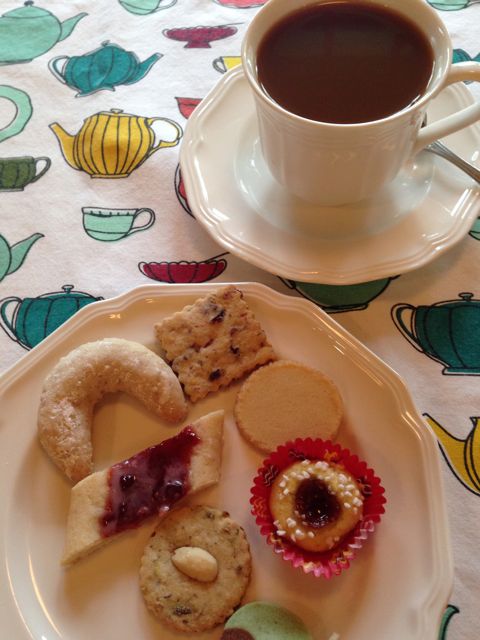
Now I love to make cookies, but it’s a lot of work to make seven different batches of cookie dough. Last Christmas when I was in cookie making mode, I noticed how similar all the cookie doughs were for the different cookies I was making. I wondered if I could make one big batch of dough and turn it into seven different kinds of cookies. The hardest part was narrowing my list down to just seven! Once I’d decided on the seven cookies I would do, I mixed up the dough and began the experiment. I ended up with over 13 dozen delicious cookies. Here ere are the results.
Basic Cookie Dough
1 lb butter at room temperature
1 cup sugar
2 eggs
1 tsp vanilla
1 tsp salt
5 – 5 1/2 cups flour
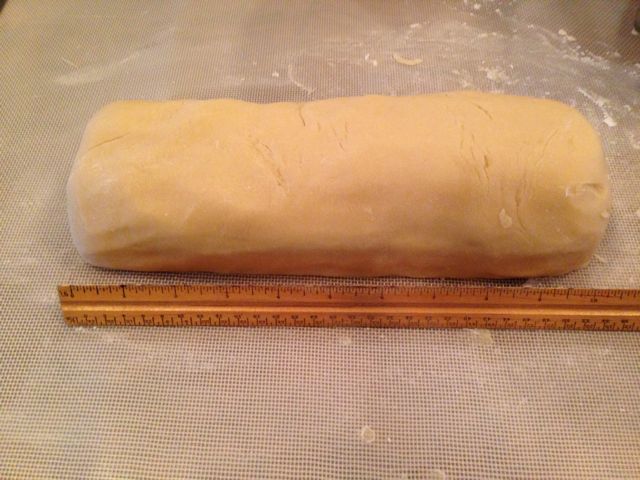
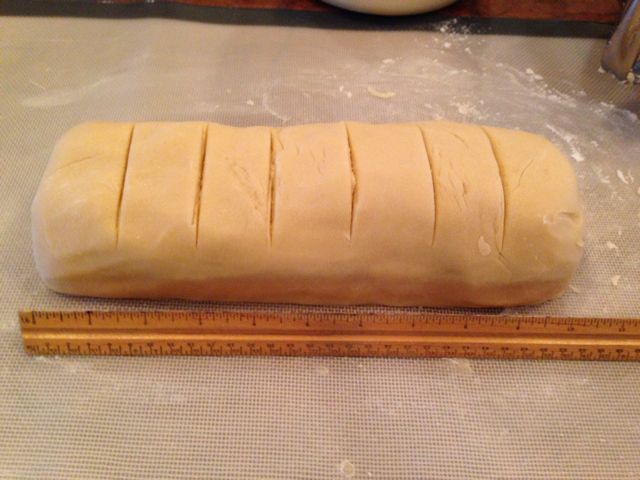
In a large bowl, cream butter and sugar until light and fluffy. Add eggs, vanilla and salt and beat until incorporated. Slowly add flour until you have a soft dough. It’s better to have it a little soft, to make it easier to incorporate the additional ingredients. Turn dough out onto a lightly floured board and knead a few times until smooth. Form into a large log 10 1/2″ long.
Make a mark along the top every1 1/2″.
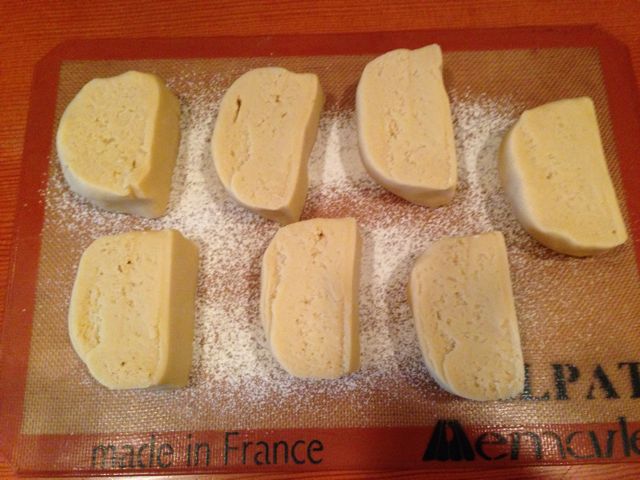
Cut the dough into seven pieces and set on a lightly floured Silpat or piece of parchment paper.
Now it’s time to add additional ingredients to the dough or shape it for seven different kinds of cookies! As you’re working with the different doughs, you might want to add more flour if you think it’s too soft—but not too much. The dough will firm up in the fridge. I labeled my doughs after I wrapped them so I didn’t get confused later.
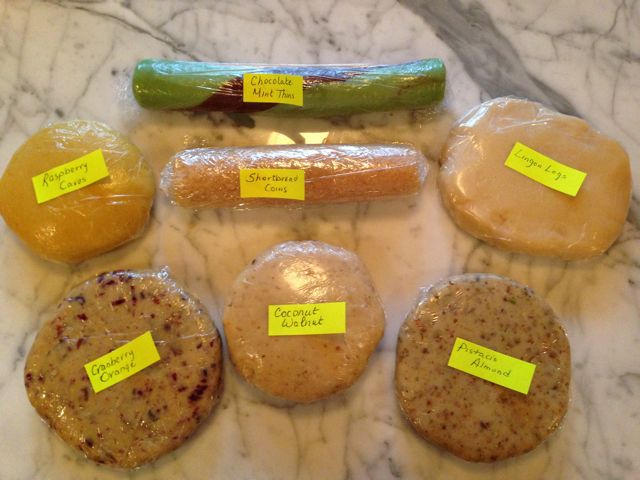
1. Raspberry Caves – To one piece of dough add 2 tablespoons fresh orange zest. This adds additional moisture to the dough, so work in 2 – 3 tablespoons of flour until dough feels smooth. Form into a ball, press to flatten a bit, wrap in plastic wrap and refrigerate.
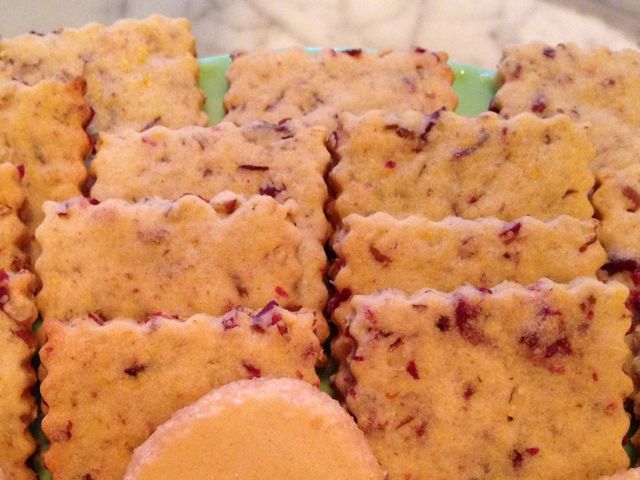
2. Cranberry Orange Squares – To one piece of dough add 1 tablespoon fresh orange zest, 1/4 cup finely chopped dried cranberries and 1/4 cup finely chopped pecans. Hint: Add a tablespoon of flour to the dried cranberries to keep them from sticking to the knife when choppin. Add additional flour to the dough if necessary. Form dough into a disk, wrap in plastic wrap and refrigerate.
3. Coconut Walnut Crescents – To one piece of dough add 1/4 cup finely chopped walnuts and 1/4 cup finally chopped coconut. Form into a ball, press to flatten a bit, wrap in plastic wrap and refrigerate.
4. Pistachio Almond Cookies – To one piece of dough add 1/4 cup finely chopped pistachios and 1/4 teaspoon almond extract. Form dough into a disk, wrap in plastic wrap and refrigerate.
5. Chocolate Mint Thins – Divide one piece of dough in half. To the first half add 2 teaspoons of cocoa powder. Once cocoa powder is incorporated, roll dough into a log 6″ long. To the second half add 1/4 teaspoon peppermint extract and 2 – 3 drops of green food coloring. Form into a log 6″ long. Wrap the two logs around each other and roll a bit more until the log is about 8″ long. Wrap in plastic wrap and refrigerate.
6. Sanded Shortbread Coins – Roll one piece of dough into a log 6″ long. Roll in 2 tablespoons of sanding or colored sugar. Wrap in plastic wrap and refrigerate.
7. Lingonberry Logs – Shape the last piece of dough into a ball, flatten slightly, wrap in plastic wrap and refrigerate.
At this point you can start making your cookies or leave the dough(s) in the refrigerator for up to three days.
When you’re ready to bake, preheat the oven to 350 degrees. All the cookies will be baked at this temperature. I use Silpats on my cookie sheets. If you don’t have Silpats, use parchment paper.
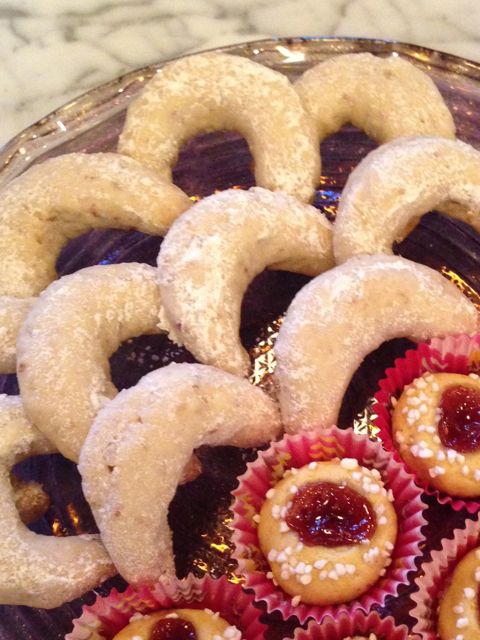
Raspberry Caves – This is one of my favorite Swedish cookies. If you want to make a big batch of just these, I’ve blogged about it before. You can find the recipe here. Divide the dough into 18 pieces. Roll each piece into a ball and place into a small fluted paper. Brush the top of each cookie with a little cream. Sprinkle with pearl sugar. With the end of a wooden spoon make a hole in each ball. Put a small amount of seedless raspberry jam in each indentation. Bake for 15 minutes.
Cranberry Orange Squares – Roll the dough into a 7″ x 10 1/2″ rectangle. Cut into 24 1 3/4″ squares. Bake for 10 minutes.
Coconut Walnut Crescents – Divide dough into 12 pieces. Roll each piece into a rope about 4″ long that is a bit thicker in the middle than on the ends. Form into a crescent. Bake for 10 minutes. Let cool about 2 minutes and press tops into powdered sugar.
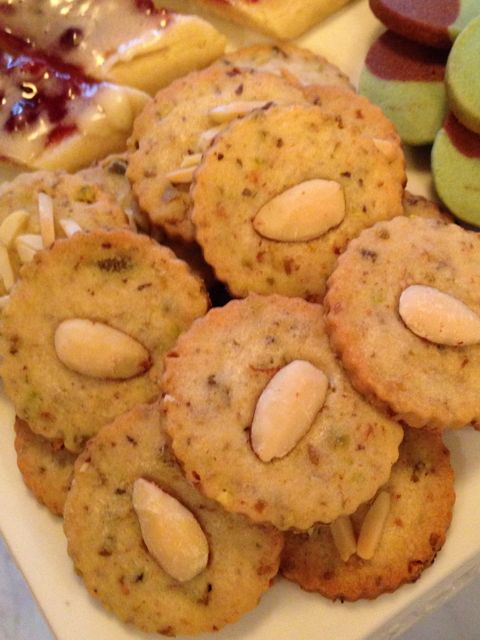
Pistachio Almond Cookies – Roll dough 1/4″ thick. Cut with a 1 3/4″ round cookie cutter. Press a blanched almond into the top of each cookie. Bake 10 minutes. Makes 24.
Chocolate Mint Thins – Cut dough into scant 1/4″ slices. Bake 10 minutes. Makes 36.
Sanded Shortbread Coins – Slice log into 1/4″ slices. Bake 10 minutes. Makes 24.
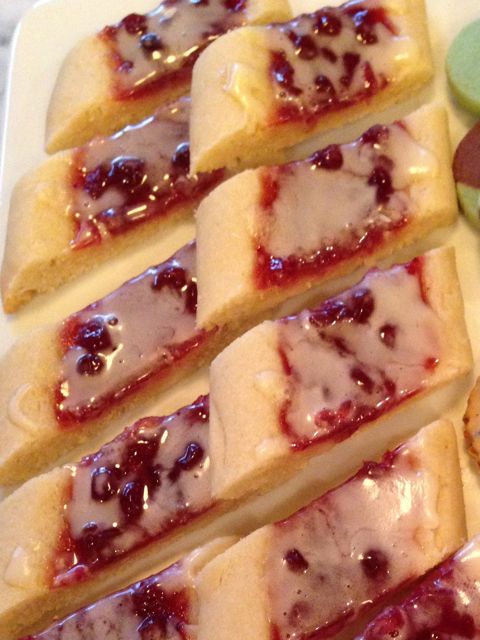
Lingonberry Logs – Divide dough in half. Roll each into a 9″ log. Press a shallow trough down the length of the log. Fill with lingonberry jam. Bake 15 minutes. While cooling, make a glaze from 1/4 cup powdered sugar, 1/2 teaspoon almond extract and 1 – 2 tablespoons of cream. After the cookies have cooled for 10 minutes, drizzle with glaze and cut into 1″ pieces on a slight diagonal. Makes 20.