• 13Jul

    My latest fabric line, Dolly Dear, is in stores and shipping now.  It has lots of pretty prints, but my favorite is the repeating stripe with the paper dolls and their dresses.

    I’ve designed a free pattern for a quit that I think any little girl would love.  The dolls are sewn into the body of the quilt, pockets are added around the outside edges, and the dresses are cut out so you can play dress up!

    I thought I’d walk you through the easy steps for making this quilt.  First, cut out three strips of the dolls and “frame” them with the Patsy Posy print.


    Sash them with the Pink Marigold fabric.

    Add borders of the same pink print.  I know they look really wide, but there’s a reason for that.  We’re going to add pockets!  At this stage, you need to quilt the quilt.  I stippled mine.

    Cut pockets and lining using the template provided with the pattern.  The front of the pockets are from the Dress Panel that goes with the line.

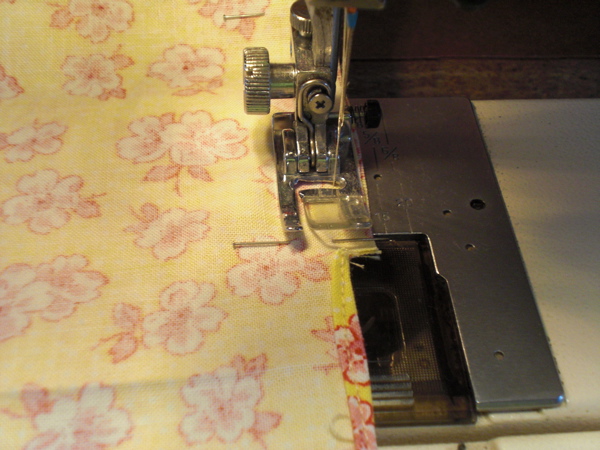
    I LOVE rickrack, and this seemed like the perfect place to use some!  Put the pocket front and lining right sides together, insert rickrack and stitch edges and bottom.

    Turn right sides out, press under 1/4″ at the top and top stitch closed.

    You’ll need twelve pockets.  When they’re finished, topstitch down around the sides and bottom.

    Fuse some batting scraps to the backs of the dresses and cut them out.

    Now you’re ready to tuck them into the pockets….

    …or dress the dolls!


    I also added rickrack to the binding!  There’s no such thing as too much rickrack, is there?  The kit for this quilt includes the 12-1/2 yards needed!

    Here are a few other things made with this fabric line.

    This adorable sundress is made with the Tossed Dolls print and lined with the Green Jumble.

    The body of this jumper is the fabric I call Bette’s Bouquet, and this pattern is perfect for showing off the doll dresses.  Both these dress samples were made by Renee.

    This pattern from Yesterday’s Charm is one of my favorites.  Carol O. made this sample for me.

    Nan stitched up the backpack for me.

    And I made this quilt, Dress Up Time, from the Dress and Purse panel.  More rickrack–two sizes!!

    If you think I’m in my second childhood, you may be right!  But, I must tell you, I didn’t play with dolls in my first childhood, so I’m making up for it now!


  • 01Jun
    Categories: brilliant ideas, Everything!, quilting Comments Off on The Summer Nine-Patch Project

    If you’re like me, it can be hard to find time to sew in the summer when there are so many distractions.  Well, this summer, why don’t you join The Nine-Patch Project?

    What’s the Nine-Patch Project?  There really are no rules.  It’s just a commitment to make one nine-patch block each day this summer!  If you do this from June 1 through August 31, you’ll have 92 nine-patch blocks at the end of summer!

    What size should they be?  Make your nine-patches any size you want.  Here are the sizes of squares to cut for various sized blocks:

    Cut 1 1/2″ squares for 3″ Blocks
    Cut 2″ squares for 4 1/2″ Blocks
    Cut 2 1/2″ squares for 6″ Blocks
    Cut 3 1/2″ squares for 9″ Blocks
    Cut 4 1/2″ squares for 12″ Blocks

    What fabric should I use?  Anything goes.  Use all the same fabric, use up strips and squares from your stash.  Surely you must have some.  You can be color controlled or completely scrappy.  You can do light/dark, dark/light, you can use two colors in each block or you can use nine different fabrics in each block.  It’s up to you.

    What if I miss a day?  Make two the next!  Miss a week, make seven next week.  C’mon, they’re nine-patches.  Nothing could be easier!  This is a no-stress, anything goes project meant to be nothing but fun.

    There’s even a Facebook page where you can sign up to join the fun.  9-Patch Project at Facebook here.  You can post pictures of your blocks and be inspired by the pictures others post.  Several of my web  friends are involved in this project, and in the end, we’ll give you some ideas for setting your blocks together.  Don’t overlook the power of the nine-patch!

    Here’s a vintage nine-patch quilt that’s in my collection.  Very scrappy, but every center is yellow.

    Here’s my version of the above quilt, just using orange for my centers and setting the blocks on point.

    Here’s a controlled scrappy that I saw on the internet.  Again, all the centers are the same.

    Here’s another on-point version made by Marla.

    I sure hope you’ll join in the fun!

  • 19May
    Categories: brilliant ideas, Everything!, fabric design Comments Off on Dear Dorothy
    Categories: Everything!, fabric design Comments: 0

    Carol Osterholm is a member of my Redwork Club.  Some time ago, she brought in a stack of blocks that her mother, Dorothy, had made in the 1930’s.  She was wanting some advice on how to put them together.  The blocks were adorable–cats, pigs, dogs, elephants….  Some were familiar to me, and others I’d never seen.  The prints in the appliques were very nice, too.  ”Hmmmm,” I mused.  ”These would make a great fabric line.  Would you mind?”  Carol said she wouldn’t mind, Timeless Treasures Fabrics loved the idea, and now the fabric is here!

    First, the fabrics.  I always like to have a large scale print in my lines.  Of course large scale in the Thirties is different than, say, Joel Dewberry large scale.

    There was a great large scale print in the elephant block, but it was a small piece, and not really big enough to see the repeat.

    I had the perfect substitute–this laundry bag.  Isn’t it fabulous.  Every laundry bag should have feet!  This, and Dorothy’s original blocks, served as the inspiration for the color palette.  The green is a great Thirties green, the pink is very raspberry and the orange, which is in this print and the little boy block of Dorothy’s, is a very muted orange, like it’s been washed and washed.  The yellow in the blocks is very buttery, and the blue is a clear, sky blue.  I just love the way they work together.

    I wanted a medium floral print, and the duck block provided that.

    I always like a monochromatic print, and there was one in the bunny block that I fell in love with.

    And what would a line be without a dot!  The kitty block had a great dot.  So, there you have it!  Those are the fabrics in the line.

    Now for the blocks.  I think Timeless Treasures did a fantastic job with the artwork on the panel.  The printed blocks look just like they’ve been stitched around.  Below are the different blocks, first, Dorothy’s original, then the reproduction under it.

    For the elephant, we changed his trunk, because an upturned trunk is the sign of a happy elephant!

    I’ve seen this cat with the big ribbon in other old quilts, but we took away part of the ribbon for our version.

    We didn’t need to do a thing to the dog.

    I’m not a big pig fan, but I have to admit, this one is pretty cute.

    I think the bunny is my favorite, both the animal and the print.

    Here’s the duck.  I’m not sure why we closed his mouth!

    There was a cute Sunbonnet Sue, but to me, there’s only one Sunbonnet Sue–the one my Grandma Kennedy made, so we substituted her.  I hope Dorothy understands.

    And I loved this boy.  His hat reminds me of a sombrero.

    When Carol saw the original blocks among her mother’s things, she asked if she could have them.  Her mother referred to them as, “Oh, these old things!”  I wonder what she’d think of them now.

    Here are Dorothy’s original blocks up on my design wall.  Carol is putting them together now, and I’ll share a photo of her finished quilt when it’s complete.

    Here’s the panel.  I designed it so it could be used just as it is, or the blocks could be cut apart and set together differently.

    Here’s how I chose to put them together after I cut a panel apart.  The free pattern for this is up on my web site.

    So, Dear Dorothy, and Dear Carol, too, THANK YOU FOR YOUR INSPIRATION AND GENEROUS SPIRITS!

  • 24Jun
    Categories: brilliant ideas, Everything!, fabric design Comments Off on Sweet Pea Pod Purse

    Perfect for your favorite Sweet Pea!  

    library-3491

    Isn’t this little bag just adorable?  My friend Robin, who stitched up the Sweet Pea Jumper for me, thought any little girl who had such a cute jumper would want a little purse, too, so she just whipped this up!  Amazing, huh?  And she took lots of photos during the process so I could post this tutorial.  If you’d like to make it, here’s how she did it.

    Purse Tutorial

    Fabric Requirements

    2) 8″ squares of Sweet Pea Doll Panel

    8″ x 21″ lining fabric

    2″ x 8″ bottom fabric

    2) 1″ x 24″ strips for drawstrings

    Instructions

    Insert the 2″ x 8″ piece between the 8″ dress panels.  The bottom of each dress should be facing the inserted piece.  Press seams open.


    library-38391

    Place this piece right sides together with the lining, matching one end.  Stitch.  Press seam open.  Now match the other short ends.  Stitch.  Press seam open.  The lining piece is longer than the panel piece.  Find the center of the insert and the lining.  Pin together.  Press outer edges.

    library-3845

    Make a 1/4″ clip at the seam line of the lining where it lines up with the insert.  Repeat on both sides.

    library-3841

    Turn under area from clip to make a narrow hem from clip to seam.  Stitch.

    library-3866

    Pin the side seams.

    library-38441

    Sew up sides of lining and panels, leaving hemmed area unsewn.

    library-38421


    Mark a diagonal line 1″ in from each corner.

    library-3850

    Stitch across market line to form a gusset.

    library-3857

    Turn right sides out through hemmed opening.  Top stitch both sides where the lining meets the panel.

    library-3865

    Make drawstrings by folding long sides of 1″ x 24″ strips toward center.  Press.  Fold in half and topstitch.  

    Insert one drawstring left side, bringing it all the way around.  Knot ends together.  Insert the second drawstring into the right side, bringing it all the way around.  Knot ends together.  Fill with special treasures for your special little friend!

    library-3489


  • 27Apr
    Categories: Everything!, fabric design, quilting Comments Off on Lollipop

    I think I’m in love


    I’ve spent the last few days appliqueing circles–not my favorite thing, but not that bad, just time consuming.  The number 7 stitch on my Elna made it quite easy.  And, it’s paid off.  I love the results!  This is the sample I’m doing for Quilt Market with my new fabric line called Sweet Pea.  Eventually it will be a free pattern.  I posted about the line on the My Quilt Village blog this morning, but I didn’t have all the blocks done then.  At this point, it’s just up on the design wall.  I still have to decide on borders, but first, I’m off to get these blocks sewn together!  

    library-49012

  • 13Mar
    Categories: brilliant ideas, Everything! Comments Off on Village Garden Month 3

    Mr. Roosevelt’s Neck Tie


    library-4317

    Here’s the third block in the Village Garden Free Block of the Month from My Quilt Village.  I love this block.  It’s so colorful, and was sooooo easy to piece!  Click here to see the completed quilt in bright fabrics.  If you want to make it in Wash Tub Prints like my sample, click here for a kit.  Here’s what the three blocks we’ve done so far look like.  As you can see, I haven’t done my final trimming!  

    library-4320

    If you’re making these block of the month blocks, I’d love to see your photos.  Please share!