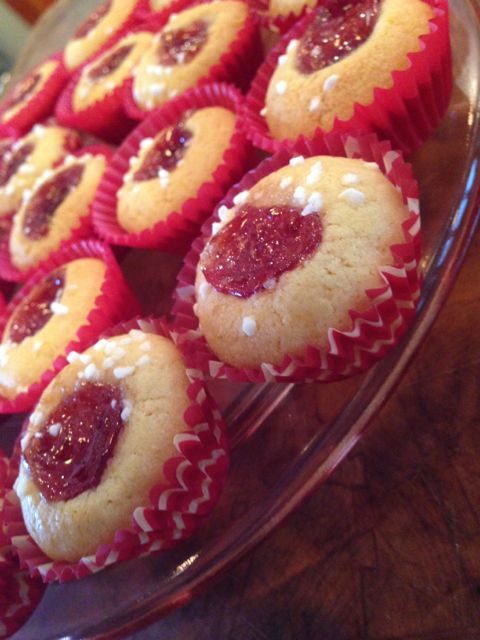
It is the tradition in Sweden that you offer your guests seven kinds of cookies when you have them over for coffee. Now that Christmas is coming, cookie baking is in full swing for me, so I thought I would share my seven favorite cookie recipes with you. First is Hallongrotor – Raspberry Caves. This is the first year I have made them, and they are my new favorite!
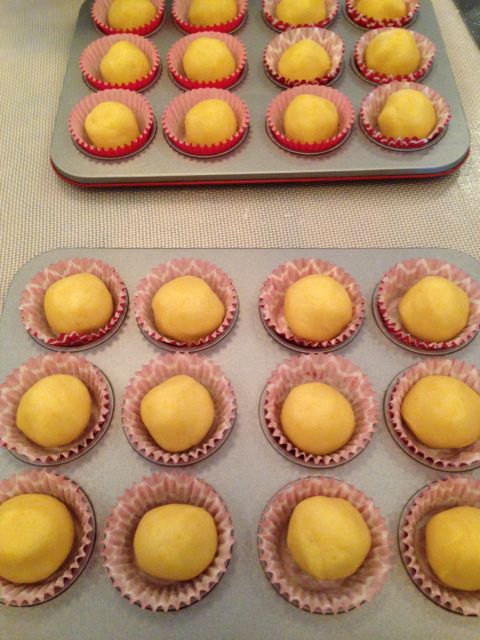
Once you make the dough, which has fresh orange rind in it, you roll them into little balls and put them into lined mini-muffin tins.
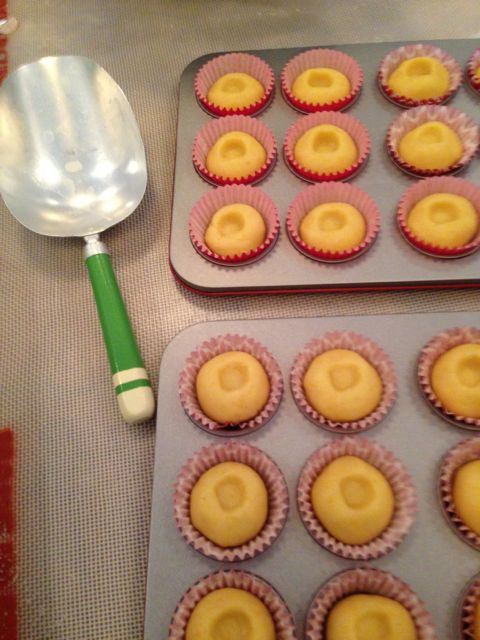
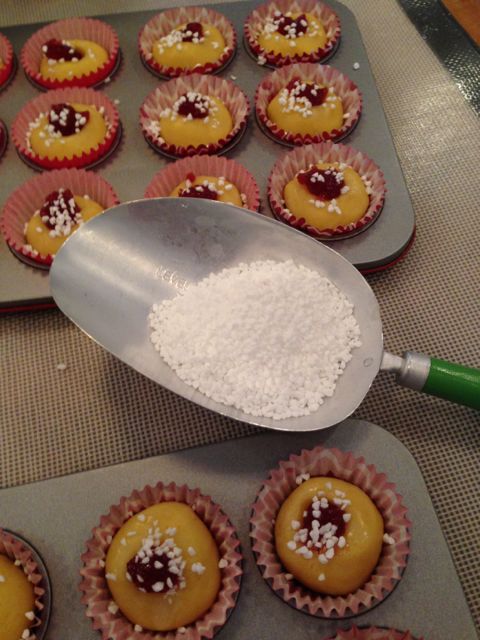
You need to make a “cave” for the jam. You could use your finger, but I found the end of this scoop worked great for me.
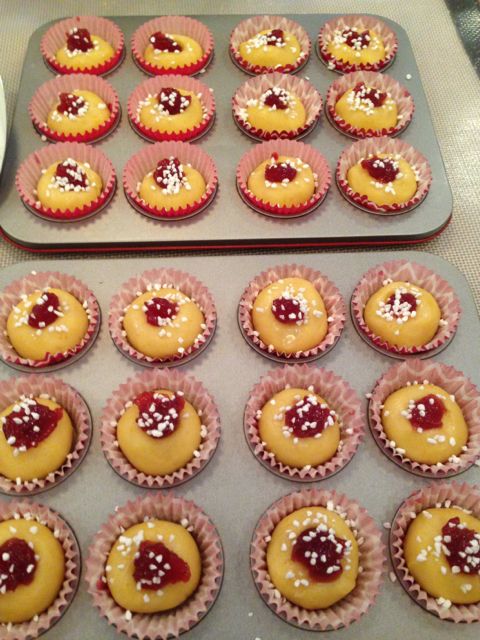
Then it’s time to add a bit of jam. Raspberry is traditional, but I suppose you could use whatever you like. Before you put the jam in, brush the tops with a bit of water. Then, add the jam and sprinkle with pearl sugar.
I used to bring pearl sugar home from Sweden with me, but now you can find it at Ikea!
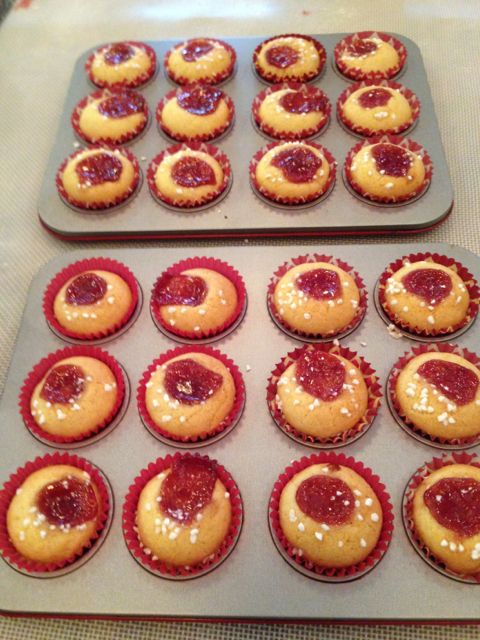
The jam bubbles up a bit during baking.
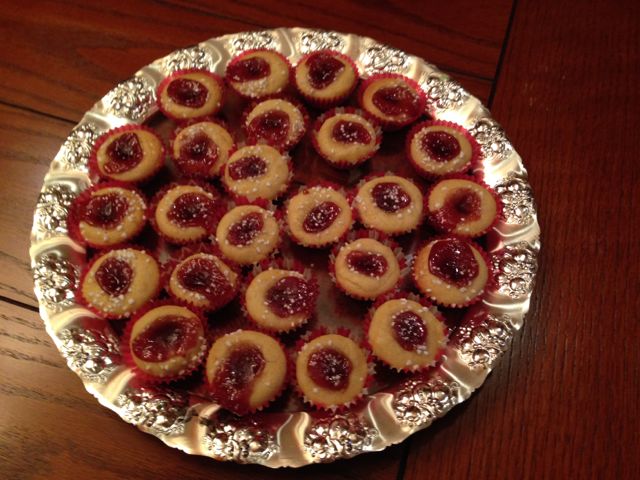
Enjoy!
Hallongrottor – Raspberry Caves
Ingredients: 2 sticks butter 1 cup sugar zest of 1 orange 2 tsp vanilla extract 1 egg plus 1 egg yolk 2-1/2 cups flour 1 tsp baking powder 1/2 tsp salt Pearl sugar 3/4 cup raspberry jam
In a stand mixer fitted with a paddle, cream butter and sugar about 2 minutes. Add orange zest, vanilla, egg and yolk. Mix until well blended.
In a separate bowl, combine flour, baking powder and salt. Whisk together to mix, then add in three or four parts to butter mixture. Mix until a nice ball comes together.
Using you hands, shape pieces of dough into balls, about the size of a walnut, and place in lined mini-muffin tins.
Make an “cave” in the top with your finger or the end of a kitchen utensil, like the scoop I used.
Brush the top of the cookies with a little water. I did one pan at a time.
Fill caves with raspberry jam and sprinkle with pearl sugar.
Categories: Everything!Comments Off on Ostkaka – Swedish Cheesecake
I was delighted to find a new blog recently. It’s called Semiswede – Sort of about Sweden, sort of not! It’s written by Maia, an American living in Sweden. I had a ball reading all the posts. There was one about Swedish cheesecake that really intrigued me. Here’s what her beautiful photo looks like.
Of course, I had to try it! So yesterday, I bought the ingredients—mostly eggs, milk and cottage cheese—and made one!
It’s very much like a custard, but the cottage cheese gives it a unique texture and chewiness. As I was rinsing the strawberries, I realized that the adorable little colander I was using was a Swedish purchase!
It was still pretty warm when I cut into it, but it had set up nicely. I think it should be spooned out into a bowl (now that I looked at Maia’s photo again) but I cut wedges. Bob agreed that it was very tasty.
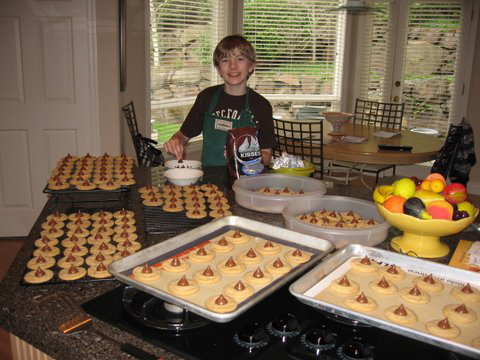
Last night my sister sent me these photos. She and my nephew, Cole, were on a cookie baking roll yesterday. The reason? Cole plans to have a concession stand at Sally’s upcoming garage sale! He will offer three kinds of cookies and beverages. Don’t you love it? I’m so happy to see that the entrepreneurial spirit lives on in the family. I’m sure we have my dad to thank for that!
Here’s the young chef.
The cookies in progress.
They made three double batches of these cookies, called Benny’s Peanut Butter Peaks. I emailed Sally and asked her if we knew who Benny was. Here’s her reply:
Benny is a character in the Boxcar Children book series. Cole fell in love with those books when he was little. Sid and Robin (my brother and sister-in-law) gave him the Boxcar Children cookbook one year for Christmas, and this recipe was in there. Benny was the youngest child, and he loved peanut butter, so you know he’d love these cookies. I think most people call them by a more-generic name, but Benny has stuck in our house.
I phoned Cole this morning and he tells me he’s planning to bag the cookies–two to a bag–and sell them for fifty cents a bag. And, he’s planning to make two other kinds of cookies! I just may have to go to that garage sale myself!
BENNY’S PEANUT BUTTER PEAKS – DOUBLE BATCH
2 cubes (1 cup) softened butter
1 cup peanut butter
1 cup sugar
1 cup brown sugar
2 eggs
2-1/2 cups flour
1-1/2 teaspoons baking soda
1 teaspoon baking powder
6 tablespoons more sugar
72 chocolate kisses, unwrapped
Put butter, peanut butter, 1 cup sugar, brown sugar and eggs into mixing bowl.Beat with electric mixer on medium until smooth and creamy.
Mix in flour, baking soda and baking powder.Cover and chill for at least one hour or overnight.
Shape the dough into balls.Shake three balls at a time in a plastic bag with 6T sugar.Place the balls two inches apart on a cookie sheet.
Bake at 350 for 8 minutes.Put a chocolate kiss in the center of each cookie and press down gently.Continue baking 2-4 minutes or until chocolate has melted down a little.
Remove cookies with pancake turner and cool on cooling rack.
Now I know not everyone agrees with that, but it REALLY can be. When I mentioned to my friend Carolyn recently that another friend, Monica, wanted me to show her how to make pie crust, Carolyn said she could use a lesson in pie crust making, too. Well, the three of us, along with several others, were going to be at a luncheon at my mom’s house, so I suggested we have a little pie making lesson before lunch. I recently posted about my grandmother’s pie curst recipe, but her recipe makes enough curst for nine two-crust pies! This easy recipe makes enough for one two-crust pie. So, if you’re up to a lesson in pie crust, follow along! Rule #1 – Wait–there are no rules. Tip #1 – Make it cold, bake it hot. Be sure your ingredients (all four of them) are cold. Recipe: 2-1/2 cups flour 1 teaspoon salt 2 sticks butter 7 – 12 tablespoons ice cold water Step 1. Put the flour and salt into the bowl of a food processor with the steel blade inside. The big, cheesy grin is not required!
Step 2. Cut the very cold butter into little cubes. Nothing fancy.
Step 3. Before you add the water, put the butter into the bowl. Pulse several times until the butter is cut up into small pieces, about the size of a pea–no smaller.
Step 4. This is the only tricky part. Because the moisture content of flour varies, you can never know just how much water you’re going to need to add. Turn the food processor on and start dribbling a little stream of water through the tube on the top. Keep dribbling until the flour in the bowl becomes a dough and starts to pull away from the sides. You can stop and check your progress. You don’t want it to get too wet.
Step 5. Dump the dough out onto a lightly floured board or Silpat. Knead a couple of times–just a couple of times. All you are doing here is making a nice ball. You don’t want to overwork the dough or it will become tough.
Step 6. Divide the dough in half and pat each half into a little disk. Wrap each disk in plastic wrap and refrigerate for at least 30 minutes. Overnight is okay! (During this demo, I didn’t have 30 minutes to wait, and my kitchen staff hadn’t made me any swap outs, like the kitchen staff at Martha Stewart does. I must have words with them about this. Of course, first I’ll have to find them.) photo here Step 7. Roll one disk out for the bottom of your pie. Just take it easy and roll a little bit in each direction until you have a fairly round piece.
Step 8. My sister, who was pressed into doing the photography on the spur of the moment, didn’t get a photo of me wrapping the dough over the rolling pin, but that’s what I do to lift it into the pan. Just drape it over the pin, then lay it into the pan. Lightly press it into the bottom of the pan and trim the edges if necessary, leaving some crust hanging over. Note: This recipe makes enough pie crust for a deep dish pie, but this was the pan my mom grabbed.
I thought the demo was going to end here, but no one wanted to see good pie crust go to waste, so we raided my mom’s refrigerator and came up with two apples and plenty of cranberries (thanks to her son-in-law, the Cranman). We added some sugar, cinnamon and a little flour and had a filling for our pie. I rolled out the other disk and put it over the top.
I crimped the edges, made a couple of slits in the top, and we put it in the oven. Remember the Tip from the beginning of this post–Make it cold, Bake it hot. That’s the trick. Everything we used to make the pie crust was cold. Now, it needs to go into a hot over. 425 degrees hot. Bake it at this temperature for 15 minutes, then lower the oven to 350 degrees and finish baking.
We were having such a great luncheon, I almost forgot to take it out! But, I think it turned out great. And I hope you’re ready to try making pie crust! Let me know how it turns out, and tell all your friends how easy it is–or not. You could let them think that you know magical things that they don’t!


